AI Image Editing: All at Once or Step by Step?
Use a cafe scene and editing research to organize connected changes, inspect preserved details, and decide when to continue or return to an earlier version.
On this page
An image is already close to what you want. The composition works, and the light feels right. You only want to change the chair upholstery, remove a paper cup, and add a vase to the table. Should you ask for all three changes together, or make three separate edits?
Decide how the changes relate before deciding how many steps to take. When the final requirements are clear and compatible, you can organize them in one instruction. When the next decision depends on seeing an intermediate result, work in stages. For connected changes, such as light and shadows, explain how they should change together. Whichever route you take, inspect both the new work and the parts you already liked.
This is a decision guide. The cafe scenes are AI-generated teaching illustrations made to explain the tasks and inspection points. We did not run a one-pass versus multi-turn performance comparison, and the illustrations do not establish which approach is more reliable.
Turn “a few more changes” into a specific brief
Imagine the image below is for a cafe's interior introduction. You are happy with the window, the furniture positions, and the floor composition. The new requirements are:
- Chair upholstery: replace the terracotta fabric on both the seat and backrest with dark brown leather, keeping the wooden frame and backrest shape.
- Paper cup: remove it from the table and restore continuous wood grain where it stood.
- Right side of the table: add one small ivory ceramic vase without obscuring the window.
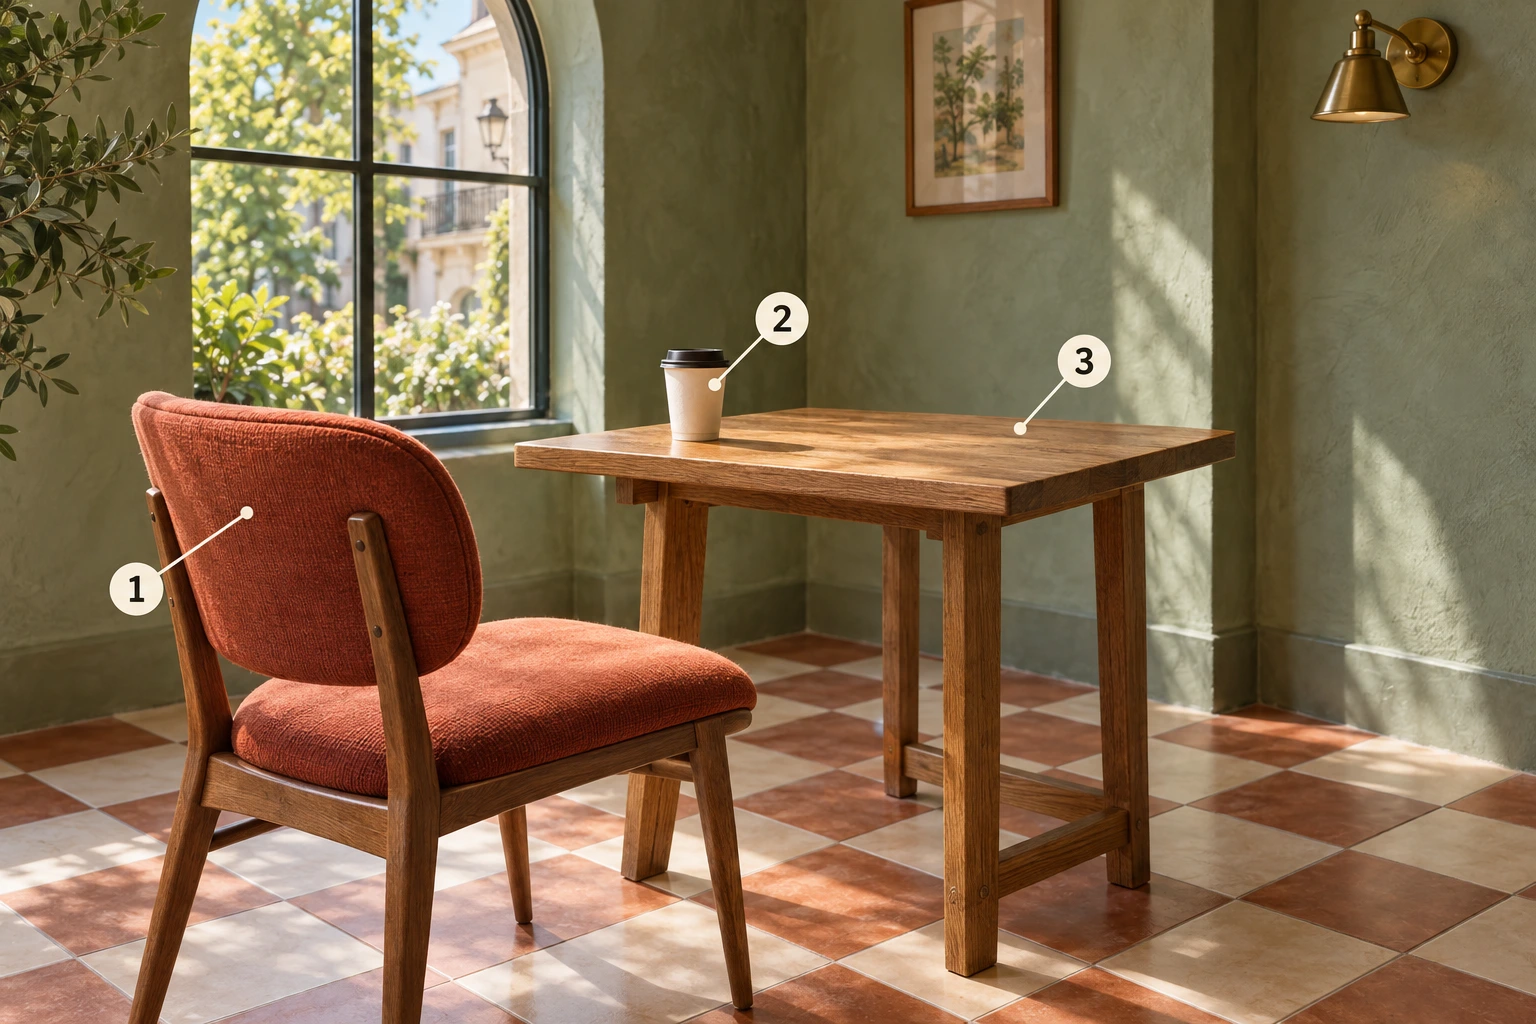
That list is only half the brief: what must stay the same? Here, it is the camera position and crop, window divisions, furniture structure and placement, floor joints, and existing daylight direction. The upholstery's colour and reflections need to respond to its new material, so they cannot also be required to remain unchanged.
“Preserve” describes an outcome you can check. Whether a generative edit achieves it must be judged against the original. Repeating “keep exactly the same” does not lock the pixels.
Organize instructions around the relationships between changes
The following three situations call for different ways of organizing the work. These are editorial recommendations, not a ranking of model performance.
If the final requirements are clear, you can put them in one brief
Changing the upholstery, removing the cup, and placing a vase each target a different object or area. If you already know you want all three, you can list them together and check each one separately. A single request can still have a clear structure; it need not be a stream of adjectives.
Consider splitting the work if an output misses a requirement, or if you need to identify which instruction caused a misunderstanding. The immediate value of splitting is that it makes a problem easier to isolate. It does not guarantee a better image.
For a long list, organize the brief by area or intended outcome. For example, list furniture changes first, tabletop arrangements second, and preservation requirements last. Grouping makes the brief easier to follow; it does not require a separate generation for every group.
If changes are connected, describe the connection
Now consider a different task: turn the same cafe from a daytime scene into blue hour.
That involves more than colouring the view outside blue. Light entering through the window, the wall lamp, illumination on the table, and shadows on the floor all need to fit the new time of day. You can ask to preserve the window and furniture geometry, but requiring every highlight and shadow to stay exactly the same would conflict with the task.
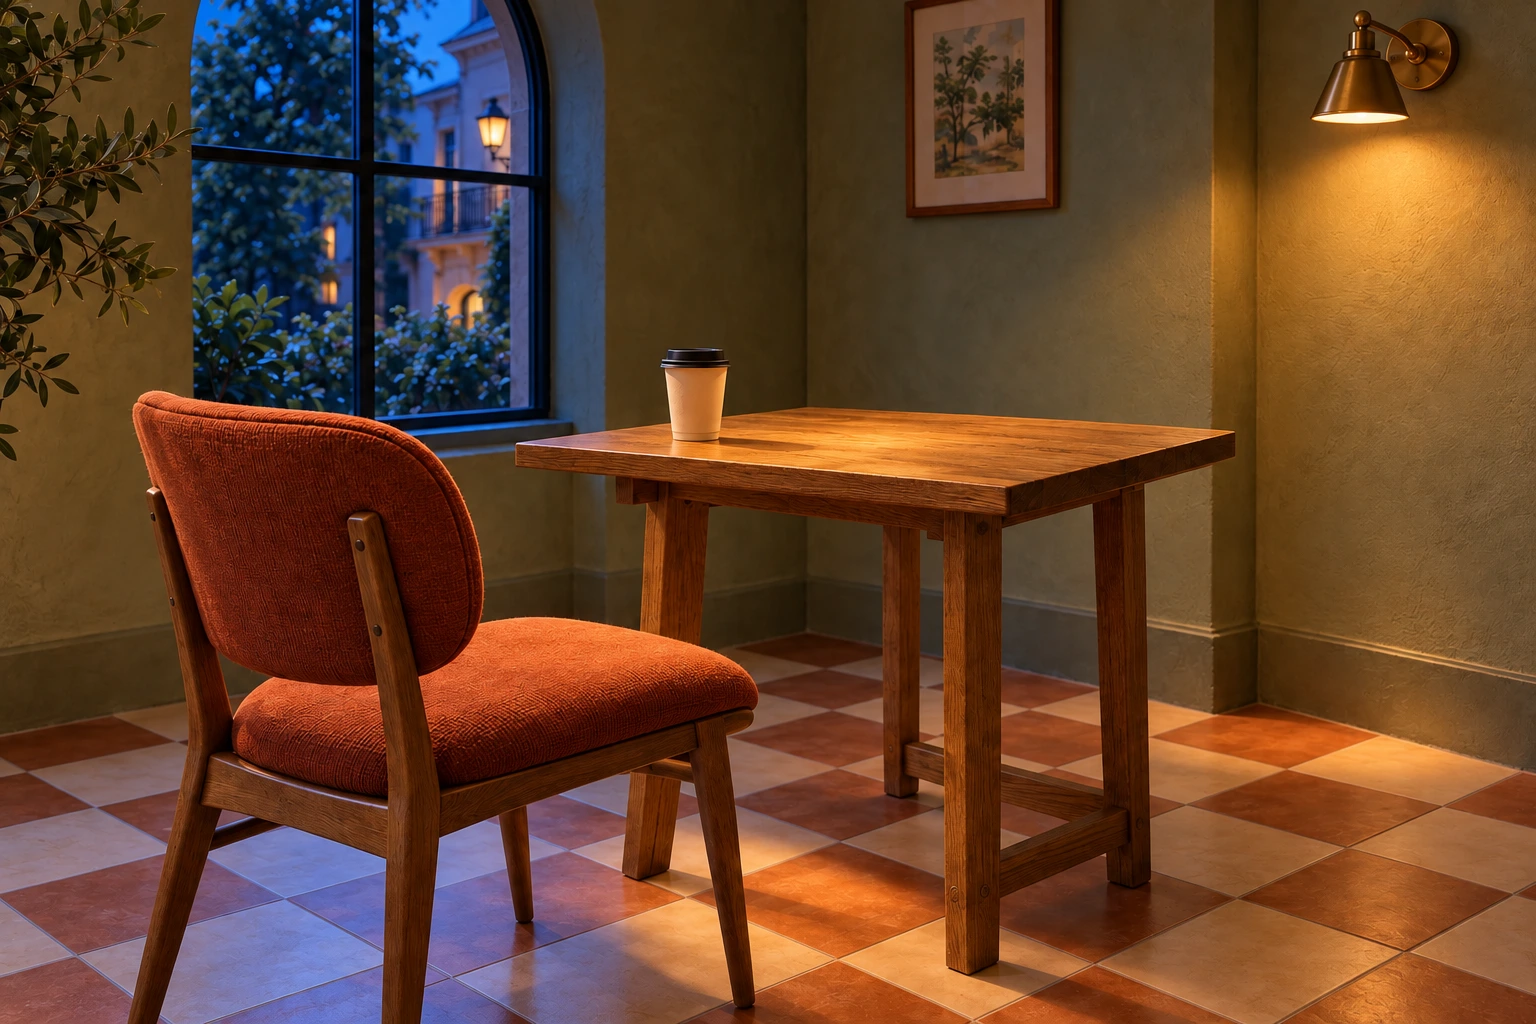
A fuller instruction would be: “Change the scene to blue hour. Coordinate the cool ambient light from the window, warm wall lamp, and cast shadows. Keep the camera position, window divisions, furniture geometry, and placement.” These requirements serve one goal—an evening scene—and do not have to become separate requests simply because they mention different objects.
If the next decision is still open, keep a checkpoint
In another version of the task, you know the paper cup is distracting, but you have not decided whether the table needs a vase.
Remove the cup first. Check whether the wood grain is continuous and whether the empty table already works. Then decide whether to add anything. Here, staging has a specific purpose: it creates a checkpoint for a design decision you have not made yet. If the empty space looks right, stopping is a reasonable outcome.
That is different from knowing all three requirements in advance and merely submitting them in three requests. Comparing those two situations would not establish which workflow is more effective.
Neither one pass nor multiple steps is a universal rule
Research on complex image editing has identified problems on both sides. Zeng and colleagues' CVPR 2026 paper examines errors in complex single-pass instructions and error accumulation in naive sequential editing. Its proposed improvements include specific training and inference methods, with defined models and tasks. It does not show that an ordinary user will always get a better result by submitting three separate requests.
The paper also distinguishes references across editing steps: a later instruction may refer to an object changed earlier, or to that object's original location. This dependency on prior context is different from deciding whether to add a vase after seeing an empty table. We use the research to frame useful checks, not to present our recommendations as a universally validated workflow. Full paper and task definitions
Multi-turn editing is also a supported way to use current image tools. Google's image-generation documentation describes conversational image iteration, while OpenAI's September 2026 Images 2.5 announcement identifies editing precision and multi-turn consistency as areas of improvement. Those statements support trying an iterative workflow; they do not promise that every image will retain every detail.
The useful question is therefore: what must this step achieve, and what evidence will tell me whether to continue?
Check what changed and what was lost
If you look only at the new vase, you may miss a distorted chair back or discover too late that the leather you approved has become fabric again. Divide the inspection into two parts, and keep the original and approved versions available.
First, check the requested changes. Did the material change, or only its colour? Were the cup and its remaining shadow removed? Does the vase have the right count, position, and relationship to the window?
Then, check the preservation requirements. Have the window divisions changed? Do the table legs still connect correctly? Are the floor joints continuous? Has the image been recropped? Changes accepted in earlier versions also need to survive this one.
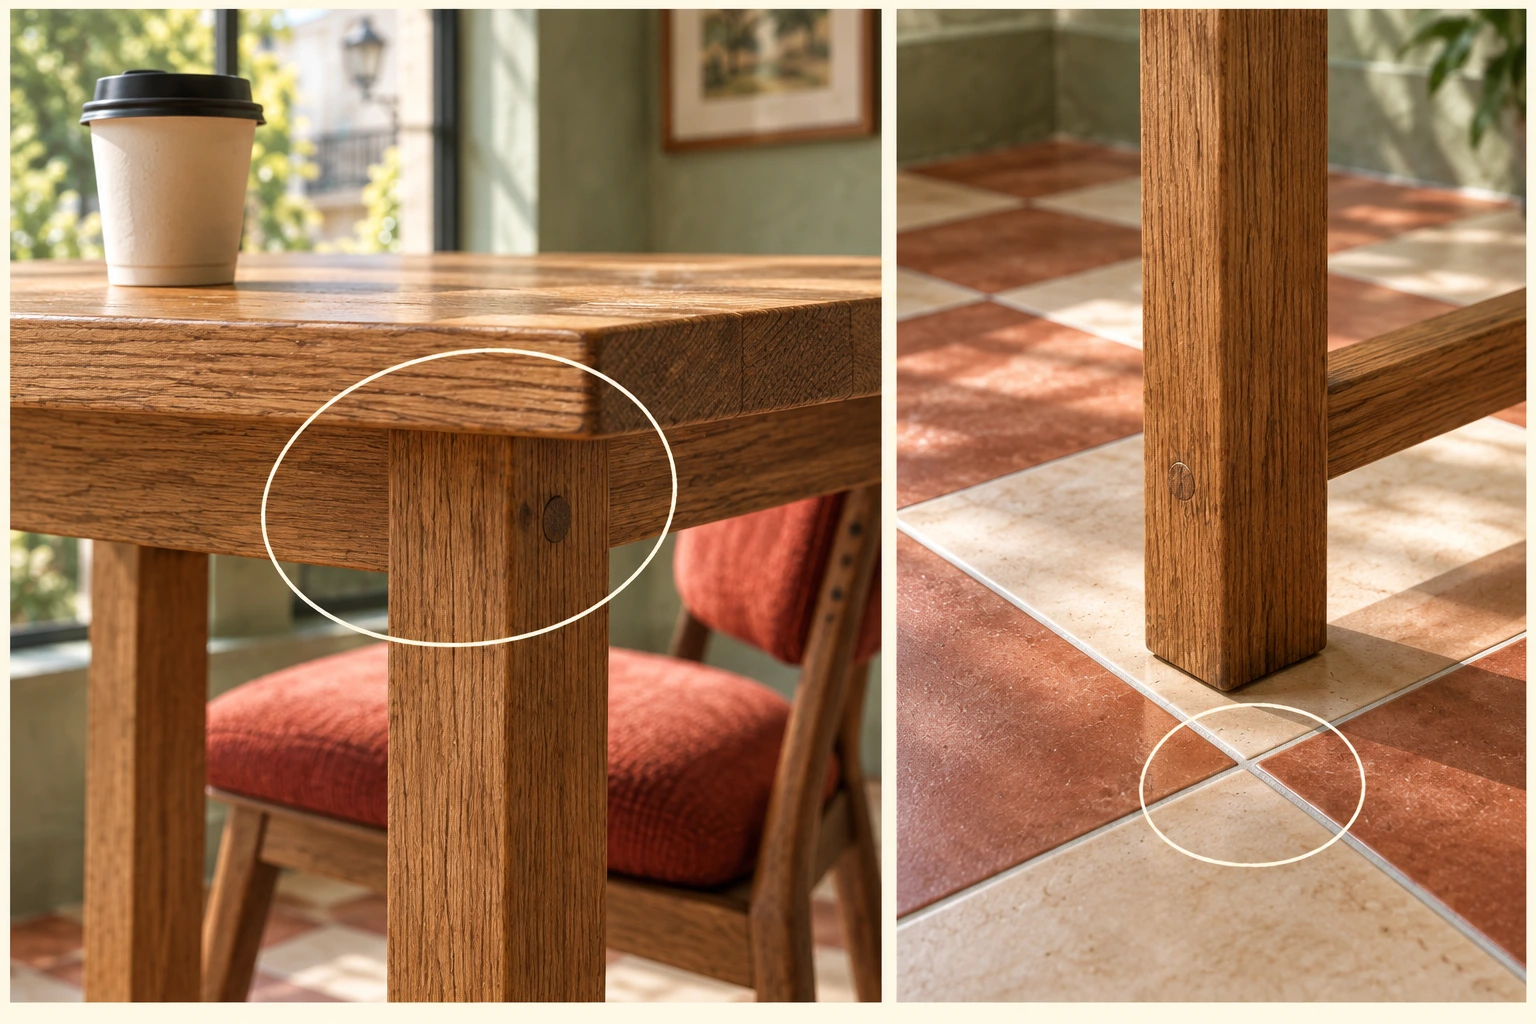
Compare the full images side by side, inspect details at a similar display scale, and return to the intended viewing size. A larger image on the page does not by itself show more trustworthy detail. The image-clarity guide explains the distinction between dimensions and sharpness.
If this step changes the scene to evening, new lighting is part of the task. If it only removes a cup, a newly golden room needs investigation. Set the checks for the actual task rather than applying an unconditional “everything stays the same” list.
OpenAI's image-prompting guide recommends checking individual outputs and the complete editing sequence, and notes that repeated edits can still change details meant to be preserved. A practical review can use three statuses: passes, fails, or unclear. If a critical detail is too hard to see, do not mark it as passing.
Continue from this image or return to an earlier version?
Before making another edit, identify the problem:
| Current situation | Next step |
|---|---|
| Required details pass inspection; only a clear new request remains | Continue from the current version, restating the new goal and important preservation requirements |
| One requested change is missing, but the rest still meets the brief | Try a focused correction for the omission, then inspect the whole result again |
| A critical structure or previously approved detail is wrong | Return to the most recent version that passed inspection; narrow or rewrite this step's request |
| No trustworthy intermediate version remains | Rebuild the final brief from the original, then check every requirement again |
| The image serves its purpose and extra decoration has no clear value | Save the delivery file and finish |
This is a diagnostic sequence, not a promise that returning to an earlier version will improve the result. The original gives you a known reference, but you must also describe again the changes you still want.
For example, if you restart from the original and write only “add a vase,” the cup is still in that input and the chair still has its old upholstery. When restarting from the original, state the cumulative final requirements. When continuing from an approved version, state the new change and remind the model which completed results must remain.
Here is an example brief for restarting from the original. It illustrates the structure and was not run as an editing experiment for this article. Replace the details with your own task.
View promptHide prompt
Edit the supplied original cafe image to meet these final requirements:

1. Replace the terracotta upholstery on both the chair seat and backrest with dark brown leather. Keep the wooden frame, backrest shape, and chair position.
2. Remove the paper cup and its corresponding shadow from the table. Continue the surrounding wood grain and lighting through the area where it stood.
3. Place one small ivory ceramic vase in the empty space on the right side of the table. Do not obscure the window or add other objects.

Preserve the camera position, crop, window divisions, table and chair geometry, floor joints, and daylight direction.
Allow reflections appropriate to the new material and a vase shadow consistent with the existing light.
Do not rearrange the room, change the number of furniture items, or add text.
Use file names you can understand later, such as “original,” “cup removed—checked,” and “final candidate.” Keep more than the last image, and do not assume a later generation is a better one.
Define the inputs and goals when comparing workflows
If you want to compare a single request with staged edits yourself, fix the original image, final goal, preservation requirements, tool, and visible settings first. Keep every intermediate output and record why you chose a final version. Both workflows meeting the brief is a valid observation.
Be explicit about what each later step receives: only the previous image reattached, the full conversation history, or both the original and current version. These provide different context. Calling all of them “multi-turn” does not make the conditions equivalent. With multiple references, assign each image a role so that they do not compete over the same requirement; see the multiple-reference guide.
A one-request workflow and a three-request workflow use different numbers of calls. Even with the same final goal, their results cannot establish better performance at the same budget or a time saving without separately recording cost, waiting, failures, and rework. A single case also cannot estimate a general success rate.
Use a production method that matches the preservation requirement
Some deliveries allow visual similarity. Others require a brand mark, person, or product region to remain exactly as supplied. Those requirements need different acceptance checks.
For regions whose original pixels must be retained, keep the original layer in a layer editor and composite only the permitted changes. Then inspect mask edges, colour processing, and the final export. OpenAI's prompting guide also points to compositing for strict pixel-preservation requirements. A sentence saying “do not change this” cannot replace that production step.
Start by writing your own task in two columns: what should change, and what must remain. Then mark the changes that need to happen together and the decisions that require an intermediate result. For more on inspecting a single-operation edit, read the background, lighting, and material editing test. Its results belong to the dated experiment described there, not to a test of the multi-turn workflows in this article.