
AI Image Clarity: Resolution, Sharpening, and Trustworthy Detail
Use image-restoration research and illustrated examples to distinguish pixel dimensions, sharpness, and fidelity, then check a product image at its final delivery size.
On this page
To decide whether an image is ready to deliver, check its pixel dimensions, visual clarity, and content accuracy separately. Upscaling adds pixels; sharpening makes edges more prominent. Neither alone proves that new detail is correct.
Imagine creating a hero image for a fictional MORI tea tin. In the thumbnail, the metallic reflections and paper label look convincing. During the delivery review, however, you zoom in and find “80 g” where the approved design requires “30 g.”
Asking for “sharper, 8K, ultra-detailed” may simply make those errors easier to see. The useful question is whether the image lacks enough pixels for delivery or content you can trust.
This article draws on image-processing and super-resolution research to build a practical review process. Its complete teaching illustrations are AI-generated around packaging scenes for the same fictional brand, demonstrating delivery dimensions, edge halos, and text verification. They are not product photographs, file inspections, or upscaling model tests.
Separate three meanings of clarity
| What to check | How to check it | What it cannot establish |
|---|---|---|
| Enough pixels | Download the file, inspect its width and height, and check the dimensions after the final crop | More pixels do not prove that lettering or materials are correct |
| Visible detail | Inspect edges, local contrast, noise, compression artifacts, and halos | Sharp edges do not prove that the detail came from the original object |
| Accurate content | Compare with product photographs, original artwork, or an approved design | An attractive image does not excuse incorrect lettering or structure |
What counts as trustworthy also depends on the task. New texture in a fictional illustration can be part of the creative result. New stitching, labels, or materials in a real product image may change what viewers believe about that product. A text-to-image creation usually has no single real original to recover, so “closeness to the original” in restoration research is not a universal standard for creative images.
Before choosing a treatment, define what may be invented and what must match a reference.
Work backward from delivery dimensions
For screens, start with pixel width and height
If you need a 1200 × 1600 pixel image, make that an explicit delivery requirement. Aspect ratio describes the canvas shape, not the file's dimensions. After cropping, check the remaining pixels again. For canvas shape, see the image aspect ratio guide.
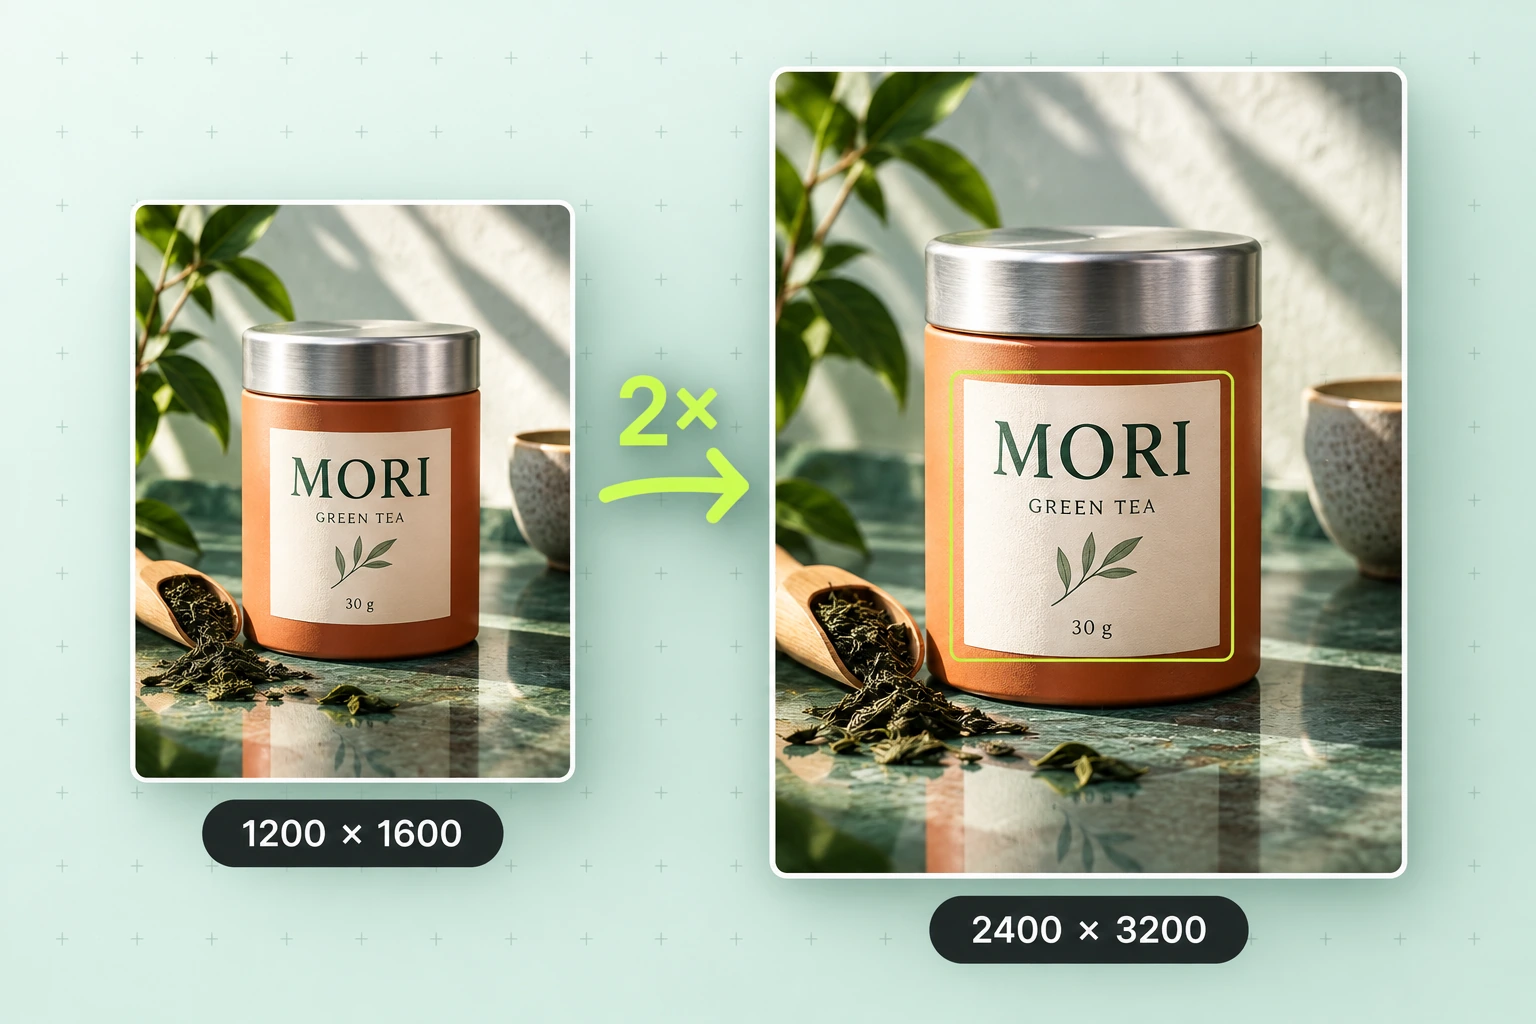
A displayed image's width on a webpage is not necessarily its file width. For example, if an image displays at 600 CSS pixels wide on a device with a pixel ratio of 2, a 1200-pixel-wide file can provide a corresponding sample for each device pixel. This is planning for that particular condition, not a rule that every website needs double-size uploads. Responsive image handling and compression also matter. MDN: devicePixelRatio
A “72 PPI” label does not by itself make a file unsuitable for screens. Changing it to “300 PPI” does not add image content.
For print, PPI relates pixels to physical size
Without resampling or changing the pixel count, increasing PPI places the same pixels in a smaller physical area. It does not create detail. Adobe: printed image resolution
Calculate the required pixels with size in centimeters ÷ 2.54 × target PPI. This converts dimensions; you still need to confirm the printer's requirements, paper, viewing distance, and source quality.
For example, the same 1200 × 800 pixel image measures approximately 4 × 2.67 inches at 300 PPI and 8 × 5.33 inches at 150 PPI. The pixel count stays the same: halving the print density doubles the physical width and height. Heights are rounded, and the calculation does not establish that either output meets a particular print-quality requirement.
Writing “4K,” “8K,” or “ultra-high definition” in a prompt can express a visual intention, but it cannot verify exact output dimensions. Current OpenAI and Google image documentation lists dimensions as separate output settings. Automatic modes vary by tool; some may consider the prompt. Check the downloaded file before delivery. These are provider documents, not a claim that every product interface exposes those settings. OpenAI image generation documentation, Google image generation documentation
Upscaling, super-resolution, and sharpening do different jobs
Interpolation-based resizing calculates a denser grid from existing pixels. Nearest-neighbor, bilinear, and bicubic methods handle edges and transitions differently, but a larger file alone does not prove that new texture corresponds to real detail. Adobe: resampling options
Learned super-resolution uses the input and patterns learned by a model to predict a higher-resolution result. Some methods emphasize reconstruction error; others also seek natural-looking texture. The results can be useful, but predicted content still needs checking against the task. Ledig et al., SRGAN, 2017
Conventional sharpening primarily increases local contrast around edges, making detail appear more distinct. Excessive sharpening may produce halos, jagged edges, or more prominent noise. It cannot verify content that is already missing; that does not mean all learned deblurring methods are unhelpful. Adobe: sharpening overview
Look where a printed letter meets the paper color. An added bright line beside the ink outline, with a dark band on the other side, may look crisper without representing original detail. Inspect such marks close up, then return to the intended usage size to judge their effect on the finished image.
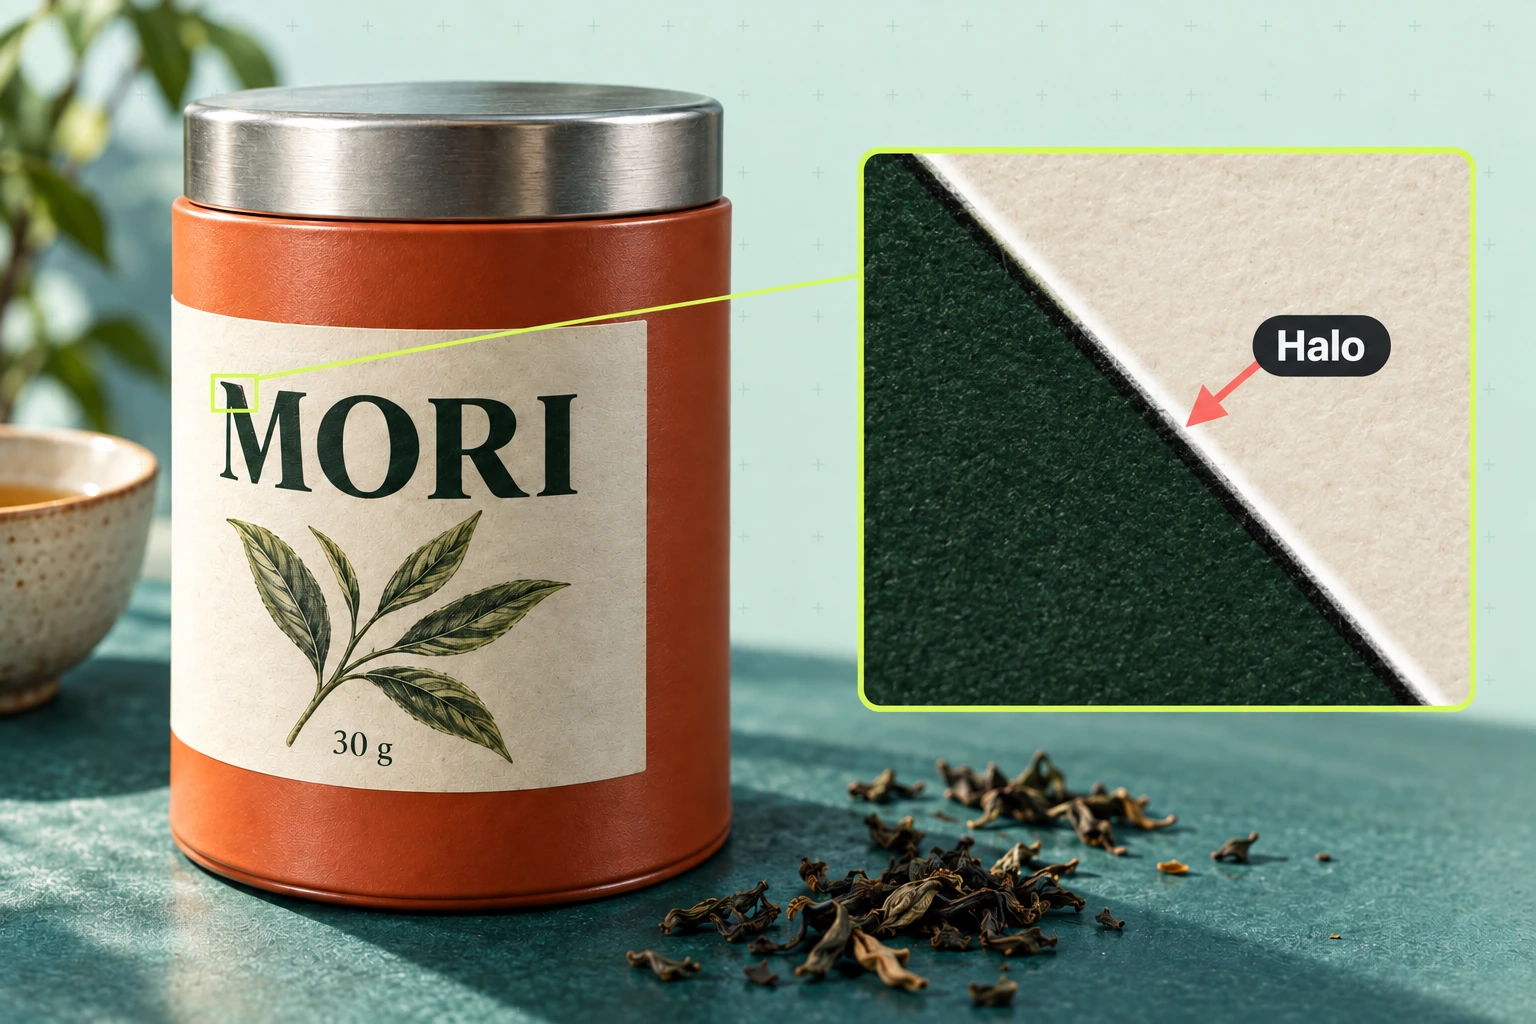
Choosing a larger generation output is another option. It gives you a larger file, but the dimensions alone do not reveal whether the service upscaled it internally or whether product details are accurate. Without evidence about its implementation, “larger output dimensions” is more precise than “native, lossless detail.”
First identify the main problem: insufficient dimensions, weak edges, noise, or incorrect content. Sharpening a misspelled word and typesetting the correct word solve different problems.
Why one low-resolution image can have several explanations
Imagine a label whose numbers are too blurry to distinguish their strokes. The missing parts may be impossible to determine from that small image alone. A model can use context and learned patterns to predict a clear character, but the prediction still needs checking against the source.
Super-resolution research describes this as an underdetermined problem: one low-resolution input may allow several high-resolution results. SRGAN paper, Section 1
The illustration below deliberately puts a clear “80 g” label beside a constructed reference specifying “30 g.” Both are legible, yet the error remains. Readability and correctness need separate checks.
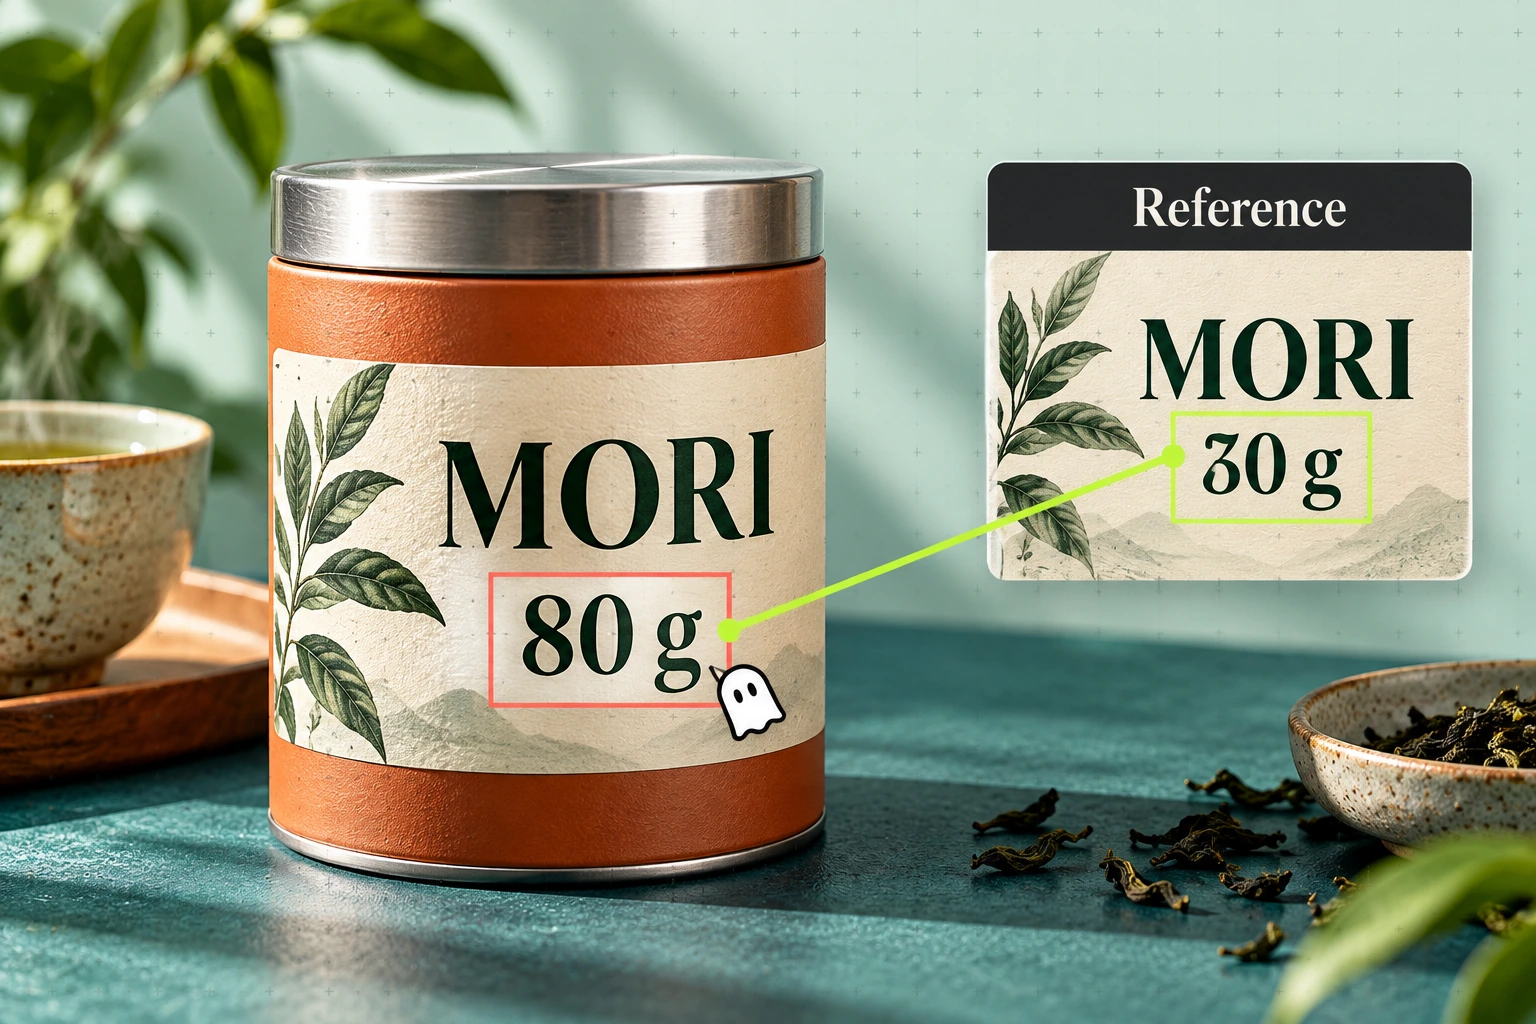
If small label text is already illegible in a product reference, a clear line of text in the enhanced output does not prove that the words are correct. Return to the source copy or a legible label file rather than allowing a more detailed output to replace the evidence.
What research tells us about naturalness and fidelity
Blau and Michaeli's perception–distortion research separates two goals: whether outputs statistically resemble natural images, and how far they differ from reference originals. Under the study's conditions, including irreversible information loss, the best achievable results face a tradeoff between these goals. Blau and Michaeli, 2018; expanded version, 2020
This does not mean that every improvement in appearance must reduce accuracy. Methods far from the optimal boundary may improve both. The paper's statistical definitions also do not directly assess brand identity, a person's identity, or letter shapes. The practical lesson is to check whether an image looks like a real photograph separately from whether it depicts the original product accurately.
Later research makes the distinction more concrete:
- Real-ESRGAN considers combinations of blur, resizing, noise, and compression, and reports distorted lines among its limitations. Unclear images can have more than a pixel-count problem; structure also deserves inspection after enhancement. Wang et al., 2021, Sections 3 and 4.4
- SUPIR demonstrates text-guided restoration, with examples that change hat materials and facial attributes. When a task requires an accurate product depiction, this control also means that “restoration” can include content editing. Yu et al., 2024, Section 4.3
- FaithDiff investigates greater fidelity in generative super-resolution and uses OCR to evaluate text images subjected to controlled degradation. Generative super-resolution should therefore not be dismissed as arbitrary invention. Improvements in that experiment, however, do not guarantee the accuracy of any particular label. Chen, Pan, and Dong, 2025, Section 4.3
These papers explain method objectives and limitations; they do not rank all commercial tools available today. The workflow below is our practical synthesis, not a universal success formula validated by those papers.
Apply the principles to a product image
Return to the tea tin. Suppose an approved design specifies the brand lettering and net weight. Delivery requires 2400 × 3200 pixels, while the existing hero image is 1200 × 1600 pixels. These are hypothetical conditions used to explain the workflow.
1. Confirm content before upscaling
List the details that must be checked: label text, the tin's outline, the opening, and its material. Decide whether background mist or decorative textures may be regenerated.
If the existing image already has the wrong brand name, correct the wording and layout first. Keeping text and logos on editable layers can help; placement on a curved surface also requires perspective, occlusion, and lighting work. Higher resolution will not automatically reveal the correct brand name.
When product evidence is unclear, preserve that uncertainty. A more detailed guess should not replace product documentation.
2. Process for the target dimensions and keep the original
This example doubles the width and height, producing four times as many pixels. That is a pixel-count relationship, not four times as much information.
Choose interpolation or learned enhancement according to the input and output requirements. For a design with correct outlines and clean lettering, first check whether ordinary resizing is sufficient. When additional visual detail is needed, evaluate generative enhancement while applying closer scrutiny to product attributes.
Keep the original file and approved design. Repeatedly overwriting the only master removes your basis for the next comparison.
3. Make comparisons answer the same question
Place both versions on the same target canvas, with the same crop and subject size. Inspect the same location in each. A larger close-up is not evidence of greater clarity.
First judge the whole image at its intended display size. Then use your editor's 100% view to inspect labels, edges, and textures. “100%” is the editor's viewing scale; its screen mapping depends on the software and display settings. It does not replace inspection at the final usage size.
For print, examine a proof at the planned dimensions. Enlarging an image extensively on screen is not a substitute for checking the finished output.
4. Verify details that change what the product means
| Detail | Reference | Response to a problem |
|---|---|---|
| Brand name and net weight | Approved copy and original logo artwork | Correct the text or layer; do not repeatedly enhance it to guess the wording |
| Tin, opening, and seams | Product photographs or structural drawings | Restore a supported outline; check distortion and duplicated edges |
| Paper, metal, or woven texture | Physical references or an approved design direction | Check whether new texture changes the product's attributes |
| High-contrast edges | Original version and target-size preview | Inspect light and dark halos and jagged edges; reduce processing where needed |
For a fictional illustration, new texture may be acceptable if it serves the creative intention. A real product needs closer correspondence. Both can use enhancement tools; their acceptance criteria differ.
Finish with the downloaded file
Add these checks to your delivery process:
- Dimensions: The final crop's pixel width, height, aspect ratio, and format meet the recipient's requirements. For print, also confirm physical size and PPI conditions.
- Content: Check important text character by character. Verify outlines and materials against explicit references, and do not present uncertain details as confirmed facts.
- Appearance: Judge clarity at the intended usage size. Inspect close-ups for halos, repeated textures, and compression artifacts.
- Versions: Keep the original, processed file, and approved design separately so you can return to an earlier version.
- Final file: Inspect the actual export. If the receiving platform recompresses images, check the uploaded presentation too.
Insufficient dimensions need a sizing decision. Incorrect content needs a return to the source. Separating those judgments early helps you spend time on what actually affects delivery.
Before your next LocalBanana creation, write down the required dimensions and the details that must be correct. For visual hierarchy and room for a layout, continue with the AI image composition guide. For arranging the product, surface, and lighting, see the AI product photography guide.
Sources checked on September 22, 2026. Research findings are used within their respective tasks and experimental limits. Product documentation changes over time; consult the current version when using a tool.