AI Product Perspective: Separate Viewpoint from Framing
Use a canister pair and a simple projection example to distinguish viewpoint, crop, and altered product geometry in AI images.
On this page
When a product looks too deep, its nearest part looks oversized, or a matching pair seems to come in two sizes, inspect the viewpoint before changing the crop. Framing decides what fits in the picture. Viewpoint decides how the visible parts relate to one another.
This distinction helps when reviewing an AI product image against a reference. You do not need to reconstruct a camera from the output. You need to recognize whether the problem is too little space around the product, the wrong viewing position, or an actual change to its design.
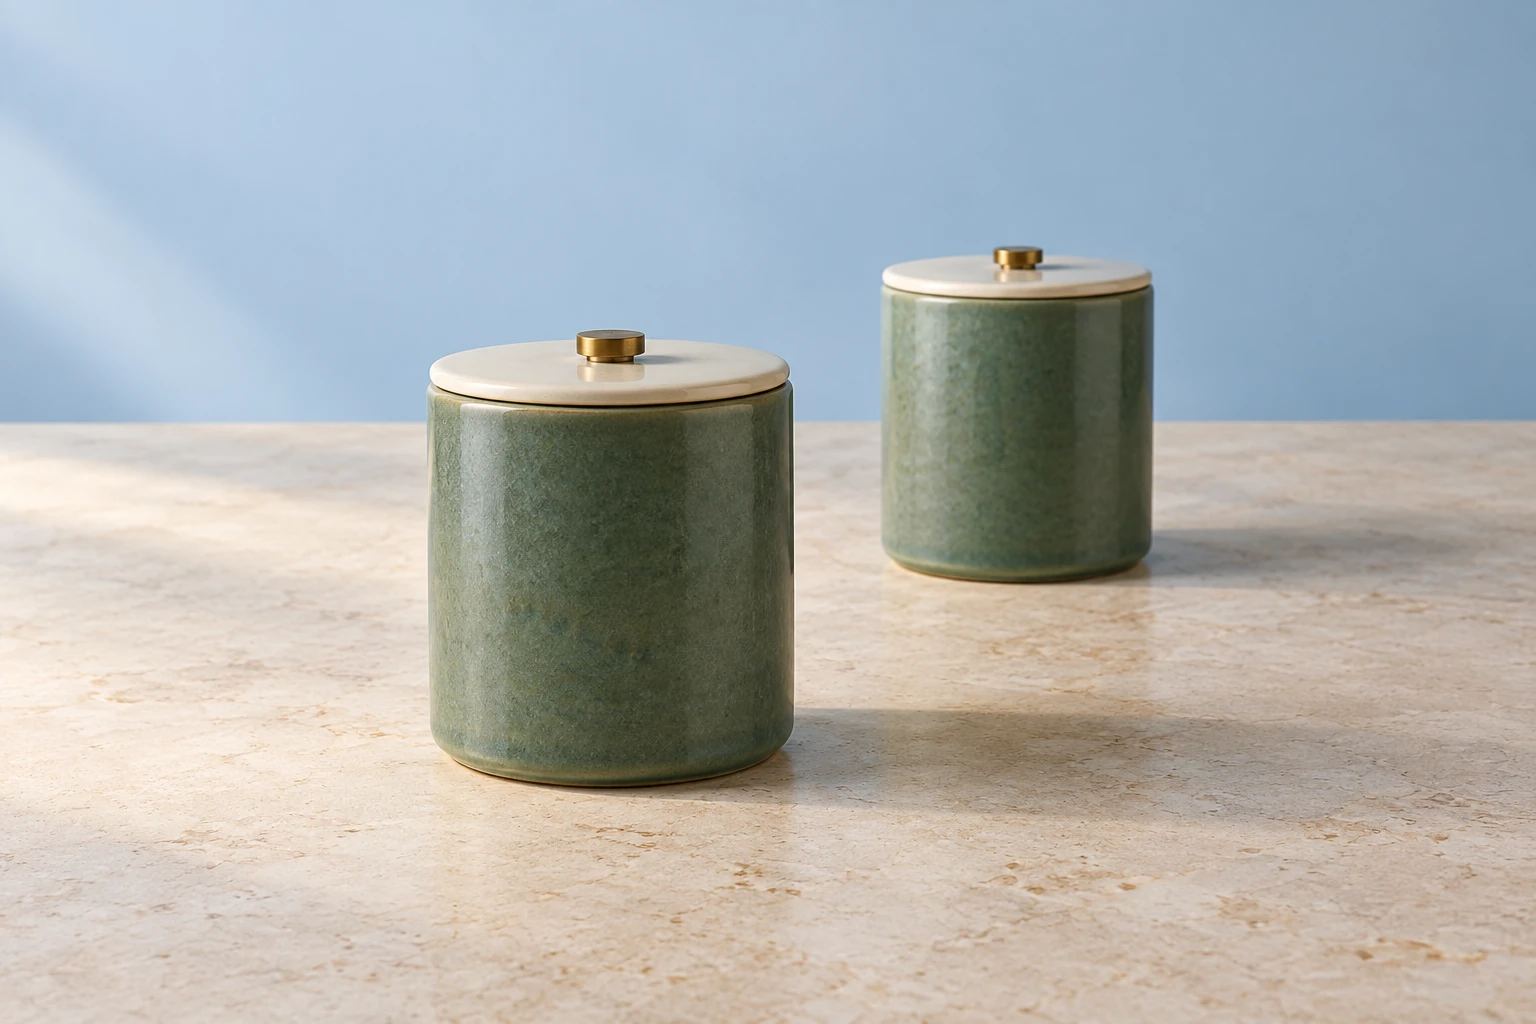
Imagine two identical tea canisters, one slightly behind the other. The near one can legitimately look larger. That alone does not mean the back canister has been redesigned.
Prepare a brief that can be checked
For this lesson, imagine a fictional tea-canister set. Each canister is 150 mm tall overall and 90 mm wide, with the same cream lid, centered brass knob, and green glaze. These are exercise specifications, not measurements of the illustration. You have a clear product reference and need a landscape catalog image containing two examples of the same size.
Write three requirements before editing: both complete silhouettes must fit; the lid seam and knob must remain identifiable; the nearer canister must not look more than 10% taller than its partner. That last number is a chosen tolerance for this exercise, not an industry standard. It turns “make them look the same size” into a reviewable target while allowing a little depth.
Keep two records beside the reference. The first describes the product: height-to-width relationship, lid shape, knob, color, and finish. The second describes its presentation: which canister is nearer, visible top area, separation, and space around the group. An edit may change the second record; a faithful product image should preserve the first. This prevents a common mistake: accepting a thinner rear canister because its new position looks attractive.
Use the same output and reference files throughout the exercise. Save each revision separately. Comparing a new result with a remembered impression makes small structural changes much harder to catch.
Separate the camera's position from its framing
For an ordinary rectilinear camera, increasing focal length narrows the angle of view and enlarges the subject on the image sensor. It can make a distant product fill the frame. It is not the same action as moving the camera closer. Nikon: understanding focal length
Keep the viewing position and direction fixed. A longer focal length shows a smaller slice of that view; cropping an existing image also retains a smaller slice. Neither operation reveals a side of the product that was hidden from that position. Move the viewpoint, however, and the visible side, overlaps, and relative sizes can change.
Real lenses can add optical distortion, and actual zoom lenses may shift their effective viewpoint slightly. Here we use an ideal pinhole model to isolate the geometric difference. The model separates camera position and orientation from image magnification. OpenCV: camera projection model
That gives you a practical vocabulary:
- Framing problem: the correct-looking canister is too small in the canvas, or there is too much background.
- Viewpoint problem: too much lid is visible, the near edge overwhelms the far edge, or one canister dominates its partner.
- Product problem: a handle, shoulder, seam, or lid has a different shape even after accounting for the view.
These problems need different revisions. A tighter crop is a good answer to excess background. It cannot turn a view from above into an eye-level view.
Why stepping back changes the size relationship
The pinhole model gives a useful, limited calculation. For two equal-height objects facing the camera, with their heights parallel to the image plane, projected height is proportional to focal length × object height ÷ depth from the camera. Here depth means distance along the viewing axis from the model's projection center; it is not a measured sensor-to-subject focusing distance.
Suppose the two canisters are each 15 cm tall and separated by 20 cm in depth. First place them 50 cm and 70 cm from that projection center. Their image-height ratio is 70 ÷ 50 = 1.40. The nearer one appears 40% taller.
Now move the viewpoint back so those depths become 200 cm and 220 cm. The ratio becomes 220 ÷ 200 = 1.10. The nearer one appears only 10% taller. You can then enlarge both together to fill the final composition.
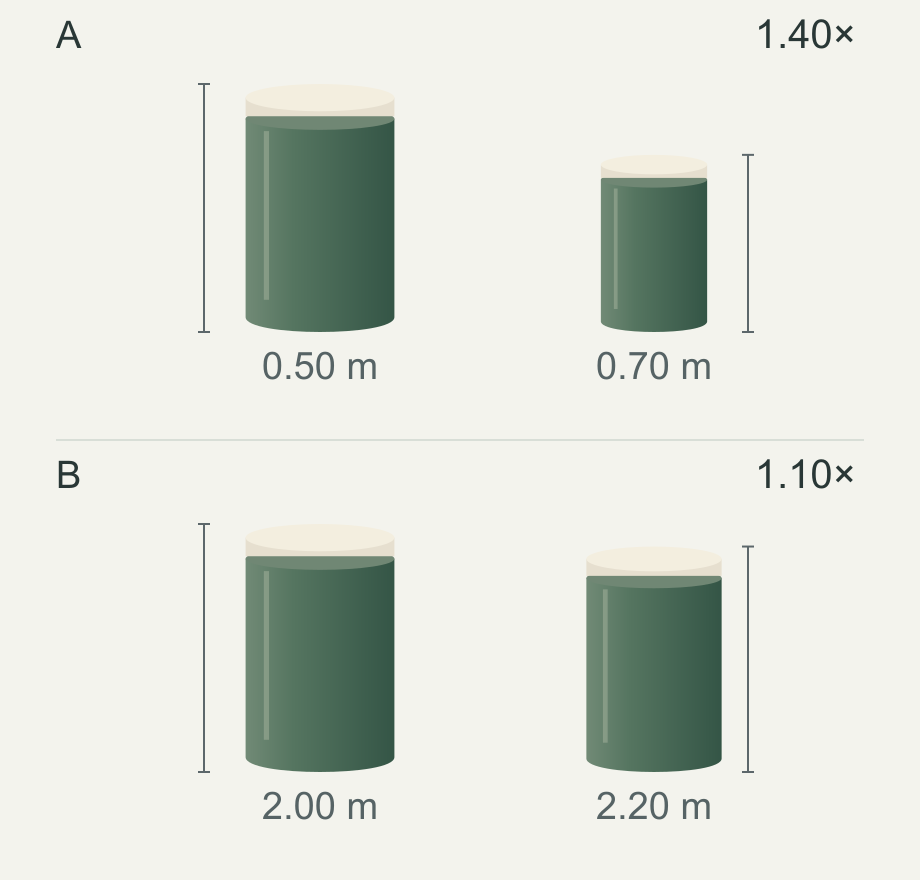
The focal-length factor cancels when you divide one projected height by the other. That is why changing magnification from the same viewpoint cannot produce the second ratio. Moving back changes the relative depths; zooming or cropping afterward changes their common display scale.
The numbers explain a relationship, not a universal shooting distance. Large products need more room; angled products require fuller geometry. AI-generated pictures may not obey a single consistent projection at all. Do not use this diagram to infer the true size or camera distance of an unknown image.
Turn the relationship into a choice
The same calculation can solve the brief. Let the front canister's depth be Z and the separation be d. The near-to-far height ratio is (Z + d) / Z, or 1 + d / Z. To keep the ratio at or below 1.10 with a 20 cm separation, Z must be at least 0.20 / 0.10 = 2.00 m in this simplified model.
There is another solution: change the arrangement. At a 50 cm front depth, a separation of at most 0.50 × 0.10 = 0.05 m meets the same ratio. The two choices have different visual consequences. Stepping back retains the deeper arrangement; bringing the canisters closer in depth reduces it. Neither requires making the rear product physically larger.
For actual camera work, this is a planning approximation subject to the stated geometry. For an AI image, it is a way to explain the intended relationship and reject a misleading result. A number in a prompt does not establish that a model has implemented a metric scene.
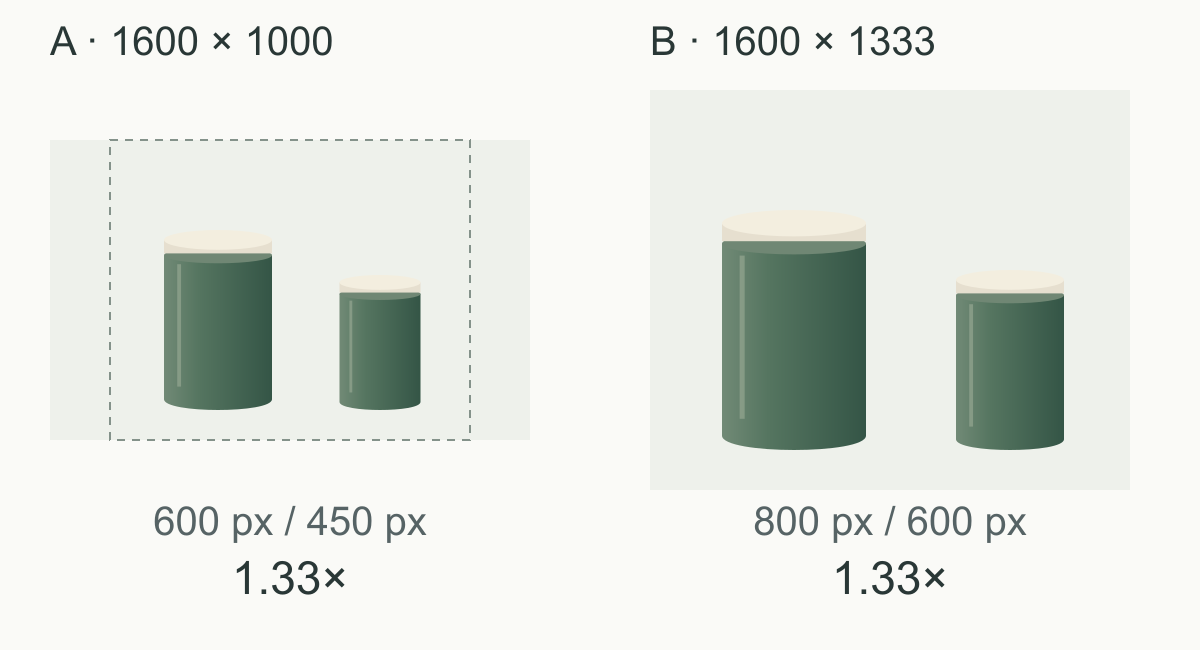
Now consider a different problem. In an illustrative 1600 × 1000 image, the front and rear canisters measure 600 and 450 pixels in height. Their ratio is 600 / 450 = 1.33. Cropping away background to a width of 1200 pixels leaves those heights unchanged. Uniformly resizing that crop back to 1600 pixels multiplies both by 1600 / 1200: their heights become 800 and 600 pixels, and the ratio is still 1.33.
This is why cropping can improve composition without solving the size relationship. Enlarging only the rear canister is a different operation: a composite alteration that also needs coherent shadows, overlaps, and perspective. It should not quietly pass as a camera correction.
Keep the measurement separate from the presentation
Measure both products in the same source image before placing them in a comparison layout. Two website cards may each fit their contents to the same height; that presentation can hide the original size difference. In our example, separately displaying the 600-pixel and 450-pixel canisters at 300 pixels tall does not make the source ratio one.
For a repeatable check, open the original file, mark the same top and bottom landmarks on each product, and record both heights with the file's dimensions. The landmarks matter more than a false extra decimal place. If a shadow extends below the base, exclude it from both measurements. If the reference includes a knob, compare knob-inclusive heights consistently.
When comparing product construction, you may temporarily rescale reference and output to the same body height. That is useful for finding a changed lid or width. It is a different inspection from the within-scene size comparison. Label the purpose so a helpful normalization does not accidentally erase the relationship you meant to test.
If one product is tilted, partly hidden, or intentionally a different size, stop applying the equal-upright-object formula. You need an appropriate reference or a revised composition. A precise-looking pixel count cannot fix a mismatched assumption; mark the result inconclusive rather than converting it into a claim about camera distance.
Choose the view that protects the product's important features
For a catalog pair, a stronger near–far size difference may misleadingly suggest two capacities. For an expressive campaign scene, that same emphasis may be intentional. Decide what the image must communicate before calling the perspective wrong.
For our canisters, useful reference features include body width relative to height, lid overhang, the position of the lid seam, and the knob's placement. Review those before the glaze texture. A beautiful surface can distract from a narrowed body or an invented taller lid.
Also inspect what the viewpoint reveals. Raising the viewpoint shows more of the lid and less of the front face; moving to one side reveals a different portion of the body and changes overlaps. A request for “85 mm” does not specify those choices. The camera-language guide explains why camera terms should be treated as visual direction in an AI prompt, rather than physical capture settings.
If preserving a specific reference view matters, say so explicitly. A useful instruction fragment is: “Keep the reference's visible lid area and body proportions; retain the same viewing height and side; adjust only the surrounding space.” This is a request to check, not a guarantee of pixel preservation.
Diagnose the revision from the visible symptom
Use this order before requesting another image:
- Compare the silhouettes. Is the product merely enlarged, or has the relationship between its parts changed? Compare reference and output at a similar displayed body height.
- Compare the view. Look at the lid ellipse, visible top area, side exposure, and overlaps. A new angle can hide a feature without changing the product. If that feature must be visible, the view still fails the brief.
- Compare the scene's depth cues. If identical objects at similar depths have wildly different sizes, or the near and far edges suggest conflicting views, flag the image for correction instead of inventing a camera explanation.
- Choose the smallest useful revision. Crop for empty space. Request a different viewpoint for excessive near–far emphasis. Return to the product reference for altered construction.
For the two-canister composition, a clearer brief is “a more distant viewpoint, then a tighter framing; both canisters should read as the same size product” than “use a longer lens.” It names the intended relationship and gives you something visible to judge. A generated result still needs comparison against the source product.
Revise the canister image in two separate passes
Suppose the first candidate has convincing glaze and intact lids, but the front canister dominates. First record the visible problem: “the near silhouette is substantially taller, although these are intended as the same product.” Do not also change the palette, tabletop, light, and styling. Those changes would make it difficult to tell which request helped or whether a new defect appeared.
For the first pass, request a less exaggerated near–far relationship while preserving the canisters' shape and the viewing side. If changing the viewpoint is allowed, describe a more distant view. If the reference angle must remain fixed, ask for the canisters to sit closer in depth instead. These are alternatives; choose one. Keeping every word from both alternatives can produce a contradictory brief.
Inspect the returned silhouettes before judging elegance. Measure overall pixel height with the same top and bottom definition for each product. Include the knob in both or exclude it from both; do not mix definitions. This ratio describes the image, not real capacity. If the back lid is partly hidden, a complete-height measurement is unavailable: change the composition or mark the test inconclusive.
Only after the relationship passes should the second pass adjust framing. Crop or extend the surrounding space to suit the destination. Check that the group still has room at its edges, no knob is clipped, and the intended depth cue survives. For a generative extension, compare the unchanged area again: the request to extend a canvas does not itself prove that the original pixels or product were retained.
One possible revision instruction is below. It is an untested template, not the prompt that produced the illustration. Replace the reference description with your own product and use only the alternative you have chosen.
View promptHide prompt
Use the supplied tea-canister image as the product reference. Make a landscape catalog composition with two examples of that same product. Preserve each canister's body proportions, cream lid, lid seam, centered brass knob, and green ceramic finish. Keep both complete silhouettes visible. Change the presentation to a more distant viewpoint with a modest depth offset, so the nearer canister is only slightly taller in the image. Preserve the current viewing side and do not invent a different lid or enlarge only the rear product. Keep the existing background, lighting direction, and colors. Leave enough surrounding space for a later crop.
Practice: decide what needs to change
Use an image editor's ruler or selection readout; no generation is required. These values are fictional exercises, not measurements of the article's picture.
Case A: the two complete silhouettes are 550 and 500 pixels high, both lids match the reference, and the pair occupies too little of the canvas. The ratio is 1.10, so the exercise's size target is met. Change framing, then recheck the edges. There is no need to rebuild the viewpoint merely to fill the canvas.
Case B: the heights are 600 and 450 pixels, with matching product proportions. The ratio is 1.33, so a crop cannot meet the 1.10 target. Reduce the depth difference or choose a more distant viewpoint; review the new result rather than assuming the wording worked.
Case C: heights are 550 and 500 pixels, but the rear lid has become a dome and the front knob is missing. The ratio passes and the product fails. Return to the reference. A numerical check is useful precisely because it answers one question; it should never replace the other checks.
You have completed the lesson when you can name the failed condition, select one matching revision, and explain what you will inspect afterward. “Try another lens keyword” does not meet that test.
If the correct product already exists in a photograph and only its surroundings need to change, preserving that photograph may be a better starting point than regenerating its geometry. The image-editing guide explains the limits of preservation requests; the aspect-ratio guide covers composition space. Keep those decisions separate from the question this article answers: where the product is being viewed from.