AI Storyboard Continuity: Screen Direction and the 180-Degree Line
Plan a two-person scene from above, check opposing eyelines, and decide when an axis change needs a clear visual bridge.
On this page
Before generating a conversation storyboard, place the people in a simple overhead plan and choose which side the cameras occupy. Then check where each person looks in the finished frames. Beautiful portraits can still form a confusing conversation when their directions disagree.
This guide follows two people sitting opposite each other in a café. It teaches screen direction and the 180-degree axis, rather than panel layout or character likeness. You need a short action, stable positions for the people, and a rough room plan. Stick figures are sufficient for planning.
The painted frames are original AI-generated teaching illustrations. They are constructed to explain a cut, not frames from a real production or a test of any model's continuity performance. The overhead diagram provides the exact geometry; the paintings illustrate the intended screen relationships.
Turn a short beat into a checkable scene
Use a modest first exercise: A asks a quiet question, B replies, and neither changes seats. Do not add a handover, a camera orbit and a new arrival while you are learning to hold the spatial relationship. Each additional action needs its own continuity decisions.
Our input sheet identifies A by her black bob and rust cardigan, and B by her tied-back brown hair and teal shirt. They sit opposite each other at a round wooden table. A white cup stays on the table. We reserve one room side for the window and choose the camera side on a sketch. These are planning facts, not requirements for every café scene.
Separate three layers: blocking says where people are; camera placement says where the viewer observes them; screen composition says what the frame shows. “Close-up of B” specifies only the third layer incompletely. It does not say where the camera is or whom B is addressing. Add those facts before asking for a beautiful close-up.
Give the viewer a place to stand
In our establishing view, A wears rust and sits on the left. B wears teal and sits on the right. They face each other across a table. The window and lamp supply context, but the central spatial fact is the relationship between the two people.
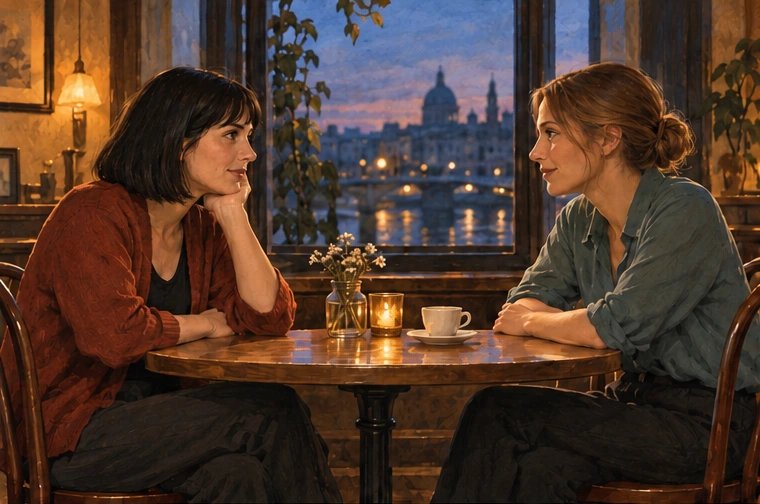
Screen direction describes what moves or faces left or right within the image. Room geography describes where people and objects actually are in the imagined space. A person can stay in the same chair while a camera moves around her and reverses her screen direction. StudioBinder: screen direction
That distinction matters when writing a shot brief. “A stays on the window side” locates her in the room. “A looks toward screen right” describes the resulting picture. Use both when both matter; one does not reliably substitute for the other.
Draw the axis before choosing close-ups
For this stationary face-to-face conversation, draw a line joining A and B. This is the axis of action. The 180-degree guideline keeps a sequence's camera positions on one side of that line so the left/right relationship remains understandable. Adobe presents it as a continuity guideline that can also be deliberately bent or broken. Adobe: the 180-degree rule
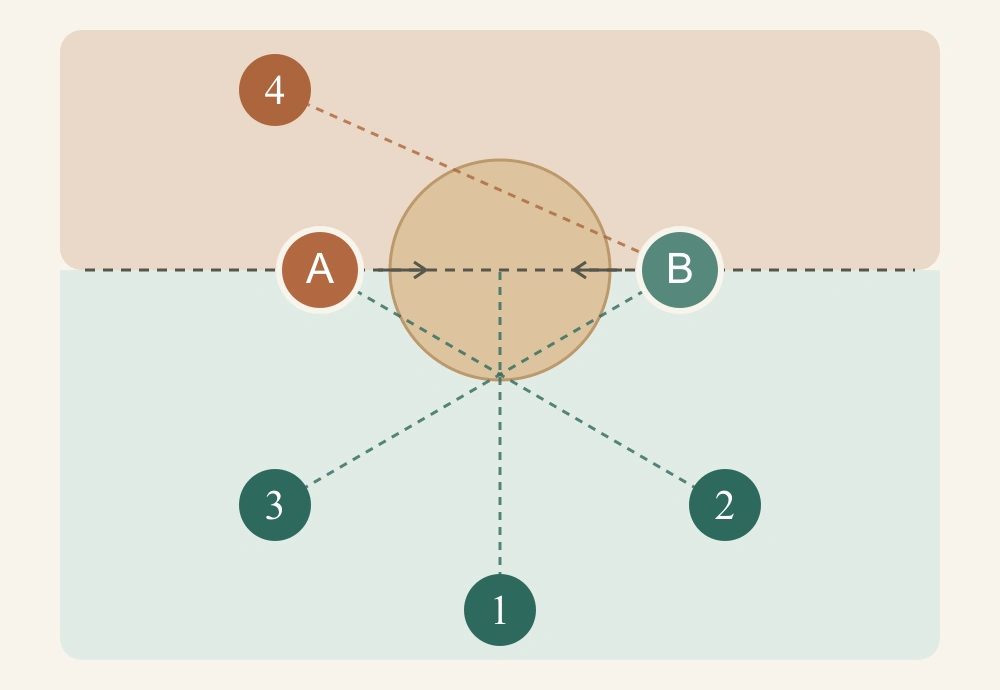
Camera 1 gives the establishing view. Camera 2 looks toward A from the lower-right side; A faces screen right. Camera 3 looks toward B from the lower-left side; B faces screen left. Their room positions remain unchanged.
The diagram is not a rule that a character must occupy the same pixels in every shot. A close-up can place A nearer the centre, and a two-shot can include both people. The useful constraint here is their directional relationship under the stated blocking and camera side.
Do not choose camera numbers merely by where you want a face inside a frame. In a real setup, eyeline height, lens choice, camera distance and the other person's position also shape the shot. This plan deliberately isolates the side-of-axis decision.
For production, pair each numbered position with a small thumbnail and a written task. Position 1 includes both people and enough table to establish the space. Position 2 isolates A without moving her chair. Position 3 isolates B from the chosen side. Position 4 is an optional teaching comparison from the other side, not an extra shot that must enter the conversation.
Do not let “reverse shot” turn into “reverse everything.” We are changing which person receives attention while keeping the intended spatial relationship. If an image unexpectedly places A in B's seat, decide whether the blocking changed before trying to repair the face.
Read the reverse shots as a pair
After the wide view, compare these two close-ups together:


Their looks oppose one another, consistent with the conversation already established. The space in front of each face also makes the look easy to read. A pair of pleasant headshots is not enough; ask whether the implied addressee is in the expected direction.
For a shot list, record the conditions separately:
| Shot | Place in the scene | Direction to inspect |
|---|---|---|
| 1: two-shot | Both seated across the table | A looks right; B looks left |
| 2: A's close-up | A remains in her chair; camera on the chosen side | A looks right |
| 3: B's close-up | B remains opposite A; camera stays on that side | B looks left |
These are conditions for this example, not universal requirements for all conversations. If a character turns away, changes seats or addresses someone else, update the plan instead of enforcing an outdated direction.
Check the height of the look as well
A left/right match does not settle every eyeline question. The gaze must also make sense for what is being seen. If B stands while A remains seated, A may look upward and B downward; the new blocking should appear in the plan. StudioBinder describes an eyeline match as connecting a person's look with the person or thing subsequently shown. StudioBinder: eyeline matching
For this seated example, review whether each close-up seems to address the other person at a plausible height. Do not “repair” every difference by forcing both faces onto the same horizontal pixel row. Frame placement, camera height and the direction of a character's gaze are separate choices.
Diagnose a cut that seems to send the gaze away
Now substitute the following image for B's close-up:
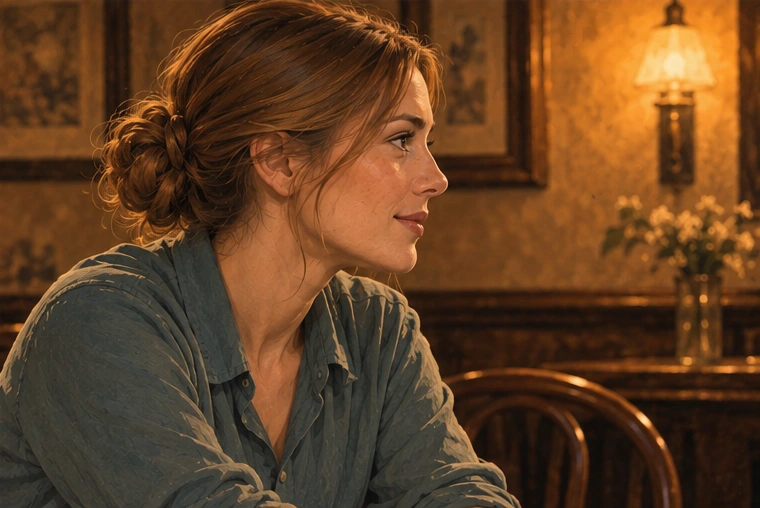
B still looks plausible on her own. Across the cut, however, A and B both look right. With no other explanation, the viewer has less support for reading them as facing one another. Camera 4 in the plan explains one way this can happen: the viewpoint moved across the axis.
Do not diagnose every matching gaze as an error. Two people can legitimately look toward the same off-screen event. Here it conflicts with our stated task: they are still talking directly to each other, with unchanged positions.
When an AI frame fails that task, revise the spatial instruction before polishing the face. Specify who is being seen, which side the camera occupies, and the required screen-facing direction. Then compare the revision with the establishing view and its neighbouring shot. A background that looks similar does not prove the camera stayed on the correct side.
Mirroring is a tempting shortcut, but it reverses everything: clothing asymmetry, signs, object positions and light. It can create new continuity problems while fixing the gaze. Recompose the shot or correct it deliberately, and inspect all those details afterward.
Follow one real failure through to its correction
The first generated four-panel sheet did not fulfill the requested teaching comparison. Its upper-right A looked right, and both lower B portraits looked left. The fourth panel was supposed to show B looking right from the opposite side.
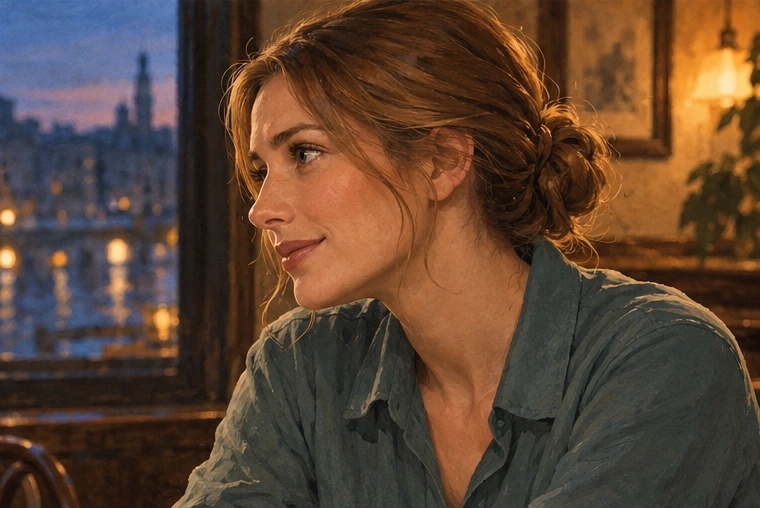
That distinction matters: this was a failure to follow our illustration request, not evidence that the first portrait was inherently bad filmmaking. Which image is suitable depends on the shot's assigned job.
We kept the original sheet and requested a targeted edit of its lower-right panel. The complete correction request was:
View promptHide prompt
Edit this four-panel café storyboard precisely. Preserve TOP LEFT, TOP RIGHT, and BOTTOM LEFT panels unchanged. Replace ONLY BOTTOM RIGHT panel. The woman B with brown hair in a low bun and muted teal shirt must be ON THE LEFT side of this panel, with her NOSE POINTING RIGHT, looking unmistakably toward the RIGHT EDGE of the picture. Show her right-facing profile, empty look-room to her right. The current panel incorrectly points her nose left. Turn the entire depicted viewpoint around to the opposite side of the table: no partner visible, a warm textured café wall behind rather than the same window composition. Keep the same woman, clothing, restrained warm gouache realism, amber light, intimate framing. No text, numbers, arrows, labels, speech bubbles, new borders or new panels. The sheet remains exactly two-by-two with ivory gutters. Critical success: upper-right A looks RIGHT; lower-left B looks LEFT; lower-right B looks RIGHT.
One corrected output was returned. We checked the nose and facial orientation first, then hair and costume, then the other three panels. The selected fourth panel now faces right, as shown above. The other panels retain their intended meaning and appearance; we do not claim that an instruction to preserve them produced pixel-identical copies.
Apply that review order to your own revision. First check the property you asked to change. Then check protected properties that might have drifted. Finally read the sequence again. A successful local edit can still make the overall conversation harder to follow.
If a tool cannot reliably isolate a panel, a practical alternative is to work on that shot separately and assemble the approved frames afterward. Preserve the room plan and reference images; changing the production method does not remove the continuity requirements. Keep the failed candidate so you can tell whether the revision actually addressed the diagnosed problem.
Cross the line when the sequence explains it
The axis is a tool for clarity, not a ban on changing viewpoints. A camera can visibly travel across it in a continuous shot. A neutral view along the axis can help bridge a change, followed by a clear new spatial view. Filmmakers can also create disorientation intentionally. StudioBinder: crossing the line with purpose
A static AI frame showing the new side does not itself show the crossing. If continuous movement matters, your storyboard needs to describe that movement, its start and end, and the changing relationship. A neutral insert is also not a magic repair: the sequence still has to let the viewer understand where everyone is.
For moving subjects, redraw the relevant line around the action. Someone walking across a room may need a consistent direction of travel across cuts. That is a different plan from two seated people exchanging looks; copying this café map would not solve it.
Practise a choice before generating another frame
Keep A and B seated as before. A looks right in her close-up. Your next image shows B looking right as well. Write two possible explanations and choose what you would need to show for each.
One answer is an accidental change of camera side: return to the plan and use the same-side B-left view if she is still addressing A. Another is that both people now look toward the café door. That version needs an understandable change of attention, such as a view establishing the door or a clearly staged turn. Do not approve the identical image for both stories without explaining the difference.
For a second exercise, plan an intentional transition from position 3 to position 4. Draw its start and end and decide whether the viewer sees continuous camera movement or an intervening neutral view and a new establishment. A single arrow marked “camera moves” is insufficient if the proposed frames hide the whole transition.
The answer criterion is whether a reader can reconstruct the relationship from the proposed sequence. Exact resemblance to these drawings is not required. Reject an explanation that simply says “180 degrees means wrong”; it must identify what changed and whether the story makes that change legible.
Test the sequence before adding polish
Read the storyboard once as simple positions and looks. Temporarily ignore expressive faces, attractive lighting and paint texture. Can you say where A is, where B is, and why each looks that way after every cut?
Then check room landmarks, costumes, props, eyeline height and action timing. The 180-degree guideline cannot repair a duplicated cup, a moved door or a hand action that skips its middle. The multi-panel guide covers those broader layout and continuity checks.
A useful delivery includes the overhead plan, the ordered frames and a note on any intentional axis change. The reader should be able to follow the conversation without solving the room again at each cut.
Attach a shot sheet that records speaker or addressee, camera-side label, required facing direction and unresolved problems. Keep the source sheet and corrected version as separate files. A renderer or editor receiving only a beautiful collage cannot know which panel is approved, which is an alternative, and which was retained to document a failure. Those decisions belong in the handoff, not in somebody else's guesswork.