
AI Product Shadows: Ground the Object Before Adding Drama
Check contact, direction and edge softness separately so product shadows support the scene. Original diagrams explain what to revise.
On this page
For a product meant to stand on a surface, check where its shadow begins before making that shadow prettier. Then check its direction and edge softness separately. A beautifully blurred shape can still make a mug look as though it is floating.
This guide is for reviewing an AI-created product scene or composing a cutout onto a new background. You need the intended surface, the intended light direction, and a reference for the product itself. The examples assume an opaque mug resting on a flat, matte tabletop, with one dominant light above and to camera left.
All three figures are original vector illustrations with deliberately drawn shadows. They explain inspection choices; they are not photographs, physically simulated shadows, AI outputs, or a model comparison.
Start at the point of contact
A shadow forms where an object blocks light from reaching a surface. In this guide, contact shadow means the small dark region immediately around the base; cast shadow means the larger shape extending across the tabletop. These are useful inspection areas, not two independent lamps or effects that every image must visibly separate. Adobe: shadow photography
Look at the lowest edge of the mug first. If the image is meant to show it resting on a table, an unexplained light gap between the base and all visible shading deserves attention. In a composite, a shadow layer may have been moved too far away. In a generated scene, the picture may simply contradict the intended placement.

The right panel's narrow dark region gives a useful place to inspect. It is not a rule to paint a black line under every object: bright surroundings can make contact shading subtle, while a deliberately hovering product should have a gap. First decide which scene you are trying to communicate.
Check direction under one stated lighting setup
For our simplified tabletop scene, light arriving from above and camera left should cast the mug's shadow away across the surface, toward camera right. This follows from the object blocking the incoming light. The arrow is a directional cue, not a measured lighting angle. Institute of Physics: light and shadows
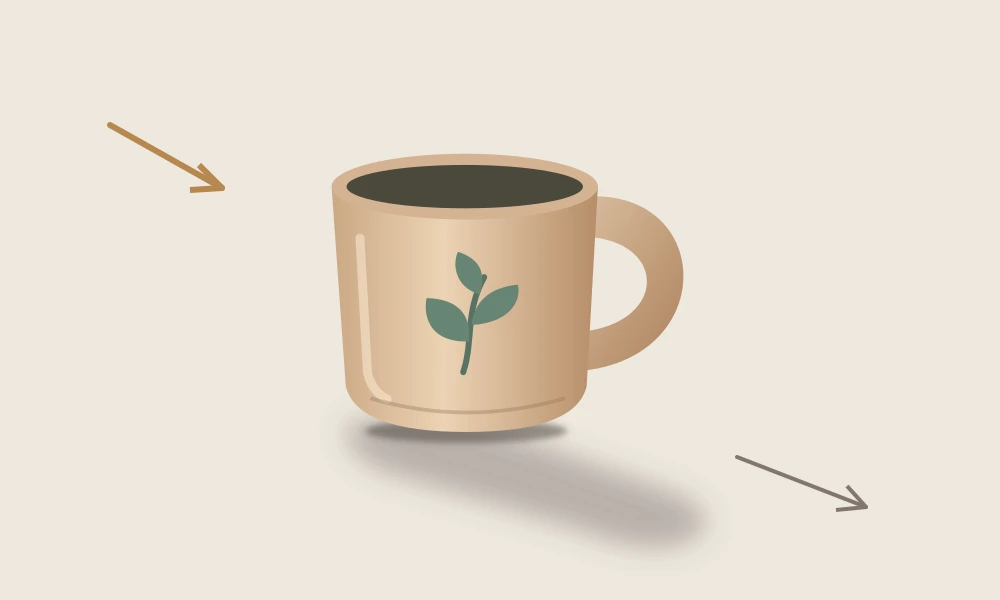
Judge nearby objects as a group. A bottle and a mug on the same surface under the same distant dominant light should not casually suggest opposing shadow directions. Perspective and a nearby light can make projected shadows diverge, so they need not be parallel lines on the picture.
This check becomes less decisive with multiple lamps, translucent objects, reflective surfaces, or strong bounced light. A highlight is also a reflection shaped by the object and light source; do not infer the entire lighting setup from one bright patch alone. If you cannot identify a coherent setup, simplify the brief before judging the picture against it.
Keep softness separate from placement and darkness
Softness describes the transition at a shadow edge. A larger apparent light source generally makes that transition broader; apparent size depends on both source size and distance. A source's name alone does not settle how soft its light will look. broncolor: hard, soft and diffused light

Changing blur does not repair a detached or wrongly directed shadow. Conversely, making a shadow darker does not make its edge harder. Reflected light and fill light affect shadow contrast, so a soft shadow can still be dark. broncolor: shadow definition and contrast
In real scenes, softness can also vary within one shadow as the object's distance from the receiving surface changes. Do not copy the uniform blur in this schematic as a universal recipe.
Revise the condition that failed
Review the full composition, then enlarge the base and outer shadow edge. Use the failed observation to choose the next edit:
- Unintended floating: check the subject and shadow positions. In a layered composite, move or reshape the contact region before adding blur.
- Conflicting directions: restate the dominant light and receiving surface. If using AI editing, request the lighting correction and compare the product against the original afterward.
- A heavy, detached blob: inspect placement, footprint and opacity separately. Lowering opacity alone leaves the misplaced shape.
- A convincing shadow but a changed product: reject or repair the product change. Lighting quality does not establish that a handle, logo or label stayed correct.
For a new scene, a useful brief fragment is “mug resting flat on a matte tabletop; one broad light above camera left; a restrained shadow extending to the right.” It expresses an intention, not a guarantee. Add preservation requirements from the actual reference, then inspect the result. The product photography guide covers broader staging choices; the image editing guide explains why preservation requests still require checking.
If you are placing a transparent cutout into a design, retain a separate editable shadow layer when practical. Follow the transparent-background guide for edge and alpha checks, then review the finished composition at its actual display size. The question is whether this product belongs on this surface under this light—not whether its shadow is dramatic enough.