AI Glass Product Images: Read the Rim, Base, and View Through
Review clear glass through its structure and background: distinguish gloss from transparency, a heavy base from water, and plausibility from proof.
On this page
Clear glass needs a readable boundary and a believable view through it. A glossy highlight alone does not establish transparency. When reviewing an AI product image, inspect the opening, the walls, the base, and the background in that order.
This guide uses a plain drinking tumbler because its simple shape makes contradictions easier to see. The task is to decide whether an image communicates this empty glass on this surface, or whether it has quietly become a solid object, a different vessel, or a filled drink.
The complete empty-glass and water-filled scenes below are separately AI-generated teaching illustrations. The rim and base details are exact crops from the empty-glass image. These are not photographs, measured ray-traced scenes, or a controlled editing test. Their optical details are examples to examine, not physical ground truth.
Define the product before choosing the correction
Write a small brief before editing. For this lesson, the deliverable is an upright, empty drinking glass on pale stone, with the ivory-and-blue backdrop still visible through it. The glass is the subject; dramatic lighting is secondary.
Separate three kinds of requirement:
- Identity: the opening, taper and solid base should still describe the supplied vessel. A real product needs its own reference; an illustration can only preserve its depicted design.
- State: empty or filled, dry or wet, standing or floating. These are different scenes, not interchangeable finishes.
- Presentation: background, light, framing and intended display size. These can change without deliberately redesigning the product.
Keep the input file unchanged and save edits separately. Record the one failed requirement you intend to repair. “Remove the water” gives you a finish line; “make the glass premium” does not. This separation also prevents a subtle failure: accepting a more attractive picture of a different glass.
Read the glass as a hollow object
Start at the top. Can you follow the opening around the rim? Does its perspective agree with the outside silhouette? Then trace the side walls down to the base. In a reference-based product image, compare the rim thickness, taper and base height with the actual product reference.
A glass can have several visible lines at its rim and base. Front and rear surfaces, reflections and refraction can overlap in a photograph; an extra line is not automatically an extra physical wall. The useful question is whether you can still understand the vessel's structure without inventing impossible seams.
In the first illustration, the rim describes an opening, the sides remain comparatively thin, and a separate band of glass makes the base visibly heavier. Those three observations do more work than the generic instruction “make it realistic.”
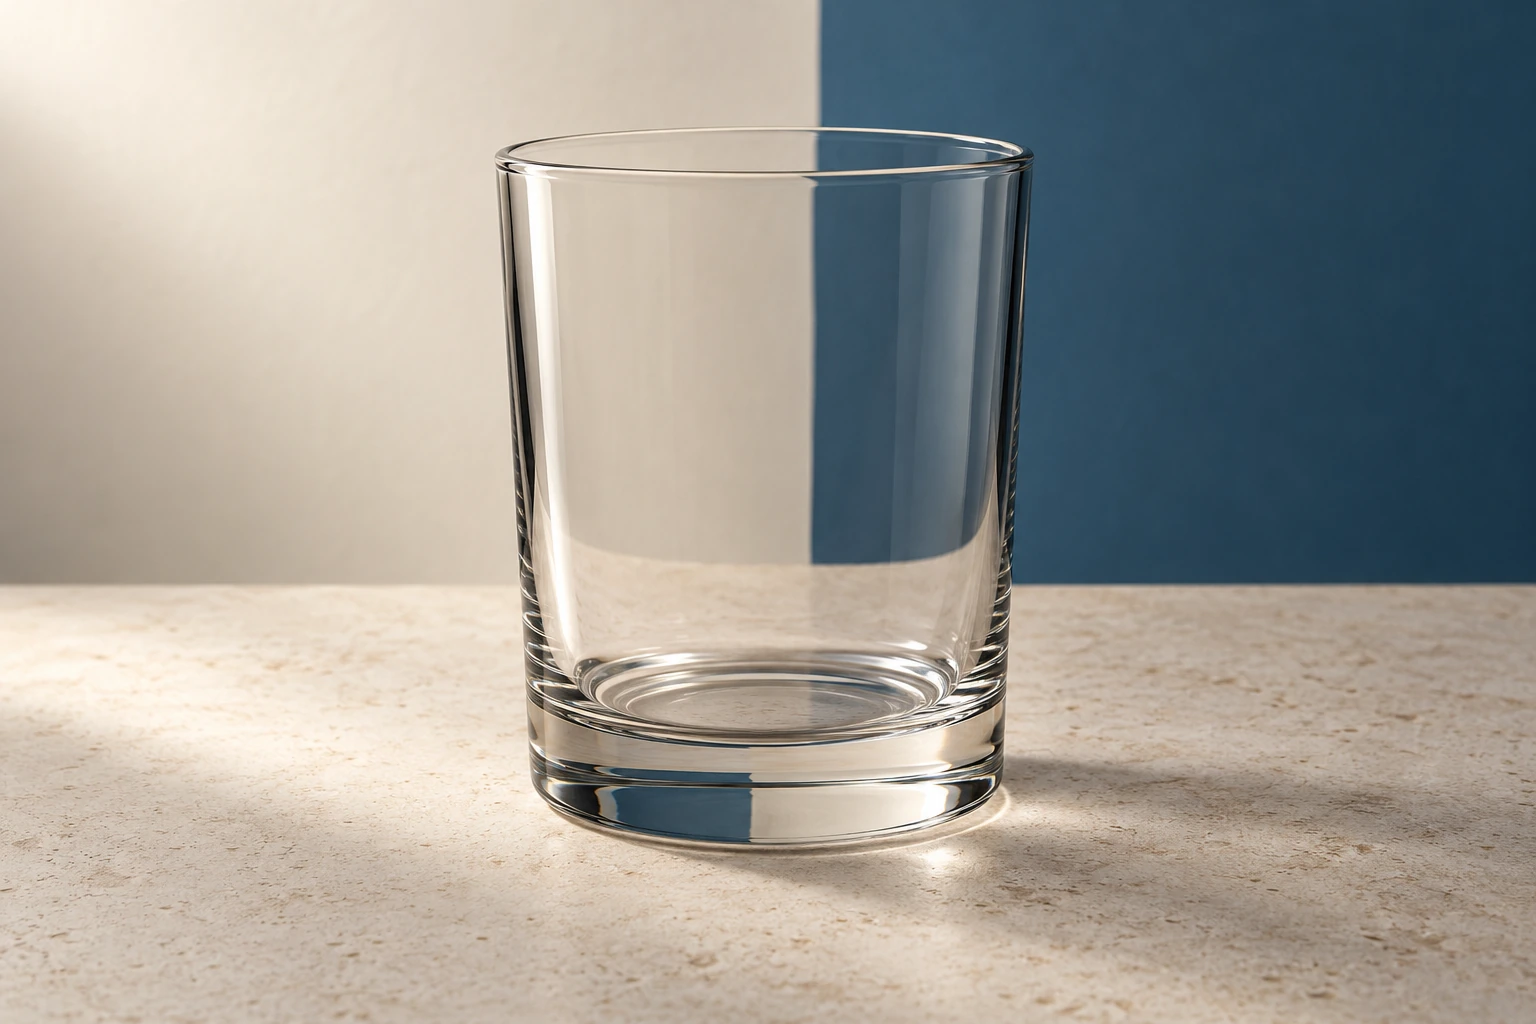
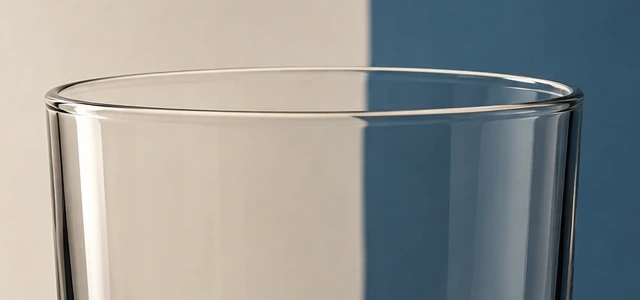
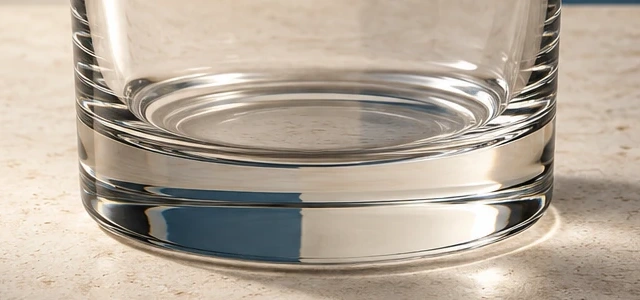
The crops give you two landmarks to revisit after an edit. Follow each side wall down from the opening to the base. Do not count every bright or dark band as a separate piece of glass; judge whether the same overall structure survives.
Do not interpret a heavy base as a pool of liquid. A base sits at the bottom of the vessel; a liquid surface defines the upper boundary of a filled volume. If the intended product is empty, an unexplained horizontal surface halfway up the walls deserves a closer look.
Keep the view through the glass connected to the scene
Transparent material transmits light while also reflecting some of it. Refraction changes a light path when it crosses between materials under the relevant conditions, which can make background objects appear displaced. The amount and appearance depend on the material and geometry. American Physical Society: Bendy Light
For a picture review, this leads to a practical distinction: background continuity is not pixel continuity. The backdrop seen through a curved tumbler need not align perfectly with the unobstructed backdrop. A small displacement is not automatically a defect. Nor is stronger distortion automatically more realistic.
Instead, follow one simple feature from outside the silhouette into the glass. Here it is the boundary between ivory and blue. Ask whether the interior still belongs to those surrounding color fields. If a new window, unrelated texture or unexplained object appears only inside the cup, there is a scene-consistency problem to investigate.
This check is easier against a quiet backdrop with one broad boundary than against a crowded bookshelf. That is why the example uses large color areas. For an early concept image, simplify the surroundings until you can describe what should remain visible. Add decorative complexity after the material reads convincingly.
An image alone usually cannot prove that its refraction is physically correct. Exact verification would require the vessel's geometry, material, camera and light positions, and the scene behind it. When physical correspondence matters, compare against a real photograph of the product or use a suitably specified rendering workflow. A plausible generated glass is not a measurement of a real glass.
Let contrast describe an edge without turning it into an outline
On a pale background, a restrained dark reflection can make a clear side wall readable. Against a dark area, a light reflection can serve the same perceptual purpose. The editorial goal is enough separation to see the shape while retaining the view through it; there is no requirement that every edge be equally bright or dark.
Glass lighting is also a surface-detail problem. In broncolor's engraved-glass example, an evenly lit setup did not reveal the engraving well; a change in lighting made that detail visible. That supports checking the feature you actually need to show, rather than treating even illumination as a complete solution. It does not prescribe one universal setup for every glass. broncolor: photographing engraved glass
For this tumbler, judge whether the rim and base survive at the final display size. If only an enormous zoom makes them legible, the image may fail as a product thumbnail even when the full-size file is attractive. Conversely, a thick black contour all around can make the glass look illustrated rather than naturally photographed. Choose the treatment for the intended style, and name it honestly.
Do not repair transparency with a global opacity slider
Lowering a whole layer's opacity blends all of its pixels with what is underneath. It does not reconstruct light passing through a curved glass wall. It can fade the rim, erase the heavy base and make solid highlights transparent at the same time. Adobe documents opacity as control of layer visibility, rather than a glass-material reconstruction tool. Adobe: layer opacity
First decide whether the problem is a pale opaque center, an unreadable outer edge or a background retained from another scene. Those need different attention. A global fade may be appropriate for a deliberate graphic overlay, but it is not evidence that a product has become optically convincing. After a background replacement, inspect both the reflected environment and the transmitted interior; cleaning only the outside border leaves half the task unfinished.
Decide whether the vessel is empty before judging liquid
Adding water changes the scene you must check. You now have the glass walls, the air above the water, the water volume, and its visible upper surface. A horizontal liquid surface should be assessed against the orientation of the container and gravity, rather than merely parallel to the sloping rim in the picture.
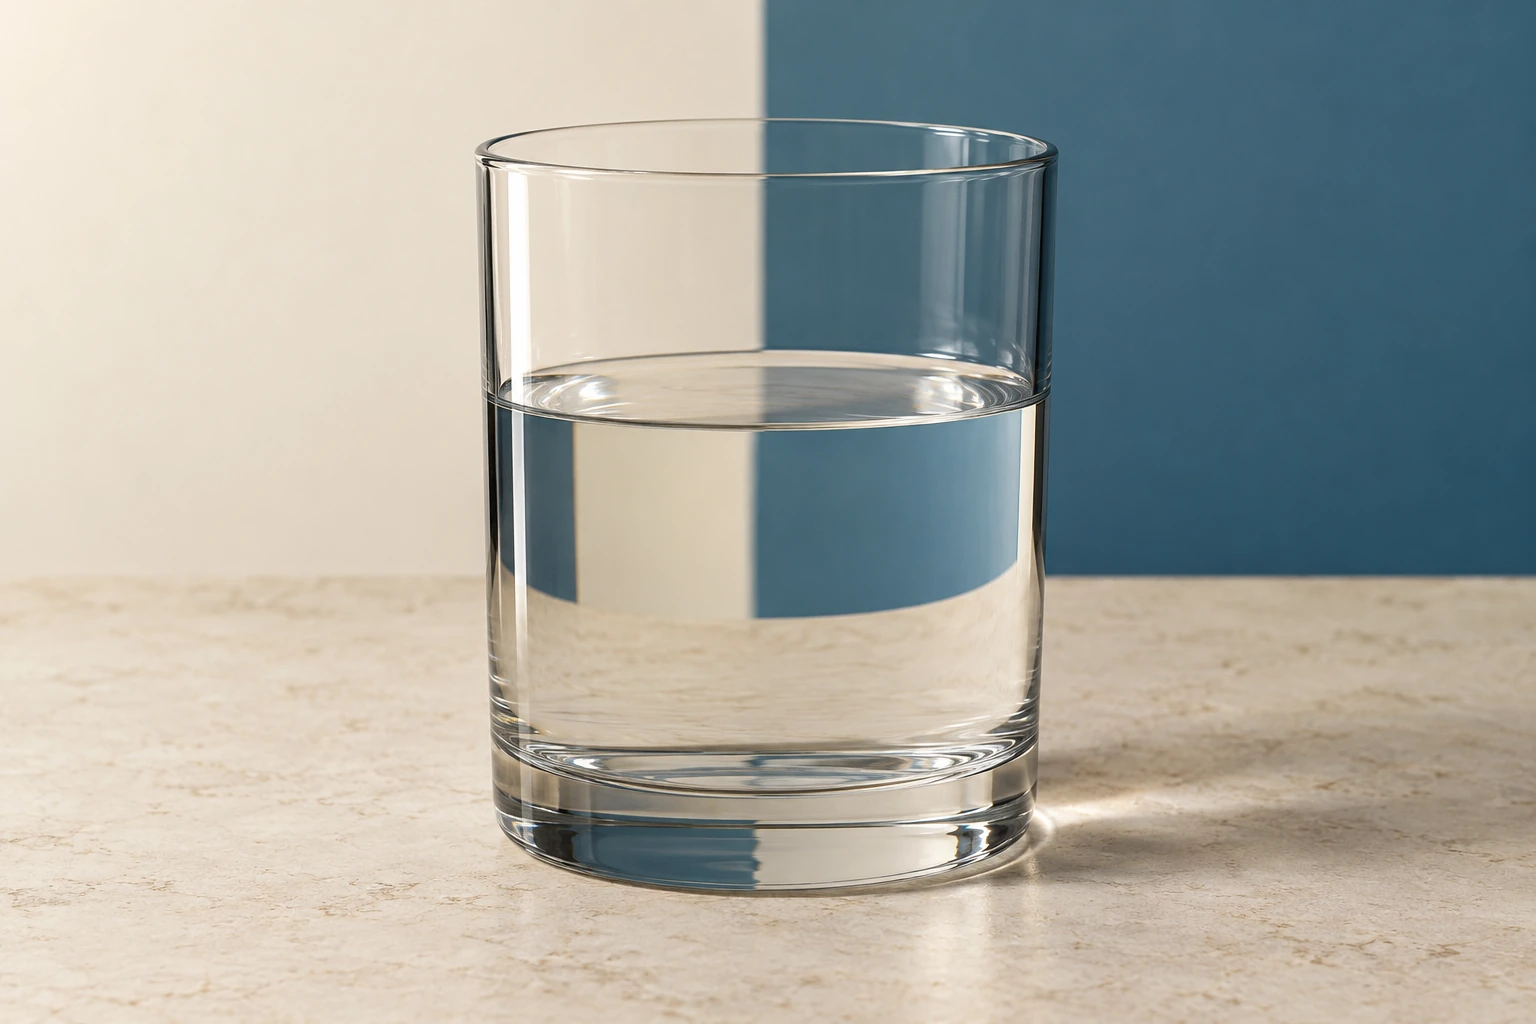
Look for a coherent filled volume below that surface, not a floating transparent disk. Then compare the background above and below the waterline. It may look different because the light crosses a different arrangement of materials. You cannot demand one specific displacement without knowing the setup, but you can question an unrelated pattern that ignores both the vessel and the surrounding scene.
Clear water does not need to be blue to read as water. It can pick up the appearance of its surroundings. Foam, condensation, bubbles and bright caustic patterns are additional scene choices, not mandatory badges of realism. If they distract from an empty-glass product brief, remove them from the brief rather than asking for more detail everywhere.
Work through one edit: make the filled glass empty
Use the water illustration as a practice input. Your task is to remove its water while retaining its depicted glass, setting and camera position. The earlier empty-glass illustration shows useful inspection features, but is not the result of this exercise and should not be treated as an exact target.
1. Establish what must survive
Before opening an editing tool, note the top opening, the taper of each side, the base height, the cup's footprint on the stone, and the outer backdrop boundary. These are the reference points you will compare afterward. Do not try to lock every interior pixel: removing water necessarily changes what is seen through that region.
This is one change of physical state, with several connected visual consequences. Deleting only the liquid's outline while keeping its old transmitted view can leave a glass that still reads as filled. Conversely, asking for a new camera angle, a thinner base and brighter light would introduce unrelated decisions.
2. Make a request with an observable finish line
Use an editor that accepts the input image. If it offers a region selection, include the liquid surface and the full water-filled interior that needs to be rebuilt; selecting only a narrow line asks the editor to solve too little. Treat that selection as guidance and still inspect the full output.
The following is a complete practice instruction, not a reported run. It specifies the state change and the geometry to preserve without demanding physically impossible pixel identity.
View promptHide prompt
Edit the supplied image of a water-filled clear tumbler.

Make the tumbler empty and dry inside. Remove the water, its visible surface, and optical features belonging to the water volume. Reconstruct a coherent view of the existing ivory-and-blue backdrop and pale stone through the empty clear glass.

Preserve the depicted tumbler's rim opening, side taper, solid glass base, position, camera angle, and crop. Keep the existing tabletop and the background outside the glass. Retain restrained glass-surface reflections; allow the interior appearance to change where removing the water requires it.

Do not add a lid, a new base, condensation, ice, bubbles, a straw, text, or extra objects. Do not turn the glass opaque or erase its rim and sides.
3. Check the requested change before judging beauty
Place input and output side by side at the same display scale. First check that the mid-height liquid surface is gone and that the whole interior reads as empty. Then trace the preserved rim, sides and base. Finally inspect the view through the lower half and its relationship to the surrounding backdrop.
Use three verdicts: passes, fails, unclear. A faint line may be a reflection rather than remaining water; inspect the volume on both sides of it. If you cannot decide, mark the state unclear rather than approving it because the lighting is attractive.
4. Choose the next step from the defect
| After the edit | Next decision |
|---|---|
| Water is gone; glass identity and setting survive | Keep this candidate and check it at delivery size. |
| Waterline is gone, but the lower half still reads as a separate filled volume | Clarify that the water-related interior appearance must change too. |
| The glass is empty, but its solid base has become thin | Return to the original input and emphasize the base as an invariant. |
| The interior works, but a side wall has disappeared | Target edge readability without asking to darken the entire glass. |
Keep a candidate only when the required state and identity both pass. Continuing from a damaged version makes it harder to know which defects belong to which edit. Returning to the original is a way to restore a known reference, not a guarantee that the next attempt will succeed.
Practice reading a result before generating another
Using the two illustrations, write answers to these questions without touching an editor:
- Which three boundaries distinguish the water-filled scene: opening, liquid surface and solid base?
- What may change inside the glass when water is removed, even when the background outside it stays fixed?
- A hypothetical result has clearer edges but a taller base. Does it pass this exercise?
Answer criteria: locate the opening at the top, the liquid surface partway down, and the heavier glass band at the bottom. The lower transmitted view and water-related reflections may change with the removed water. The taller-base result fails identity preservation; better edge contrast cannot compensate for a changed product.
Then try the edit once and attach a one-sentence verdict to your candidate, such as “empty state passes; base height fails.” This is a more useful next prompt than a long list of new adjectives. No generation is required to complete the diagnostic part of the exercise.
For delivery, retain the unedited input and the accepted candidate, inspect the actual export at its intended size, and state whether it is a concept illustration or a depiction of a referenced product. If the next step is background removal, separate transparent material from a transparent image file. The alpha-background guide explains the file distinction; the editing guide develops the broader preservation workflow.